Web services can be useful in providing real-time interfaces between any ERP System and an external 3rd party or custom application. Sage ERP X3 Web Services can be used to expose custom or existing Sage ERP X3 objects and functions as web services.
This is the first in a series of 5 posts which will step through examples of creating and consuming web services for Sage ERP X3. Here's a summary of the other 4 posts in this series if you'd like to jump to another topic:
Creating Web Services (Day 2)
Testing Web Services (Day 3)
Calling a Sage X3 Object from ASP.NET (Day 4)
Calling a Sage X3 Program from ASP.NET (Day 5)
Now on to our current topic Setting Up Web Services ...
The first step in using web services in Sage X3 is to enable web services.
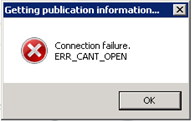
*** If the following error appears, make the sure ADXADMIN service has been started.
This is the first post in deploying Sage X3 Web Services. The next post (Day 2) will step through creating web services from within Sage X3, the next blog in this series will post on May 31, 2017.
Contact us if you want to learn more about Sage X3 Web Services features or to request help with your system.
Want all 5 days in one comprehensive guide that you can download and take with you?
Leave your name below and we'll send you a copy of our Ultimate Guide to Sage X3 Web Services. This 38-page how-to manual provides everything you need to know about using X3 web services with screenshots, step-by-step instructions, and insider tips from our expert consultants.