

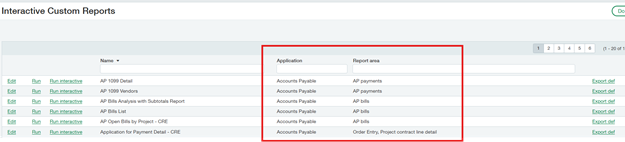
Sage Intacct ICRW (Interactive Custom Report Writer) includes prebuilt reporting areas in your environment. However, a single reporting area does not always contain every field needed for a useful report. If you need information from different reporting areas, this can be accomplished with SQL statements in ICRW.
This tutorial will explain how to join fields from two different reporting areas. For our example today, we will focus on combining the Project and Timesheet reporting areas. To complete this process, you will need permission to edit ICRW reports.
Scenario
You need a report that displays project information alongside the time entered against each project. Because the required fields are stored in two separate ICRW reporting areas (Projects and Timesheets), you will create two source reports and connect them with SQL.
Step One: Build First Report
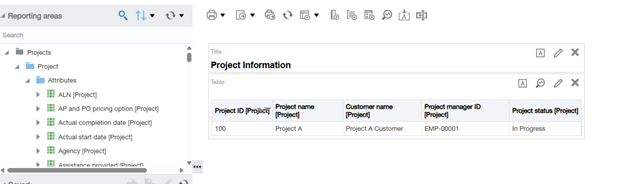
Build your first table using the Projects reporting area.
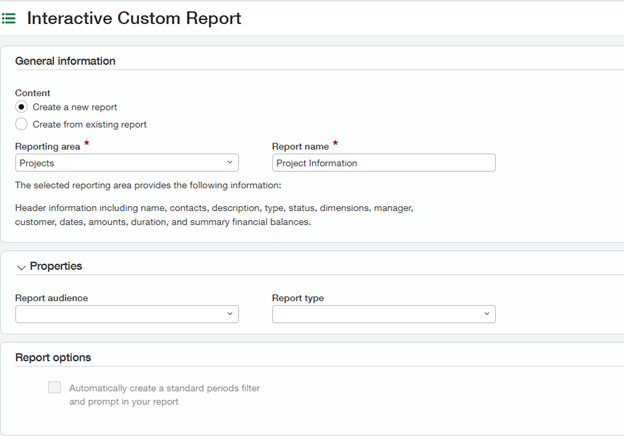
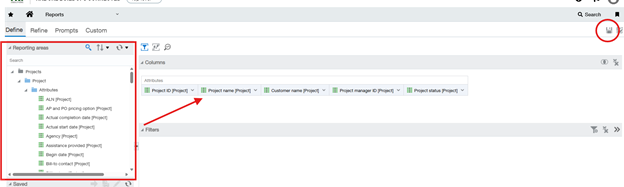
Find the fields you would like to track on the project. In our example, we are using:
- Project ID
- Project name
- Customer
- Project manager
- Project status
Then hit save in the top right corner.
Output of the first report
Step Two: Build Second Report
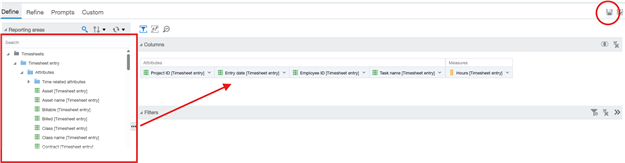
Build the second report using the Timesheets reporting area. We will be adding the following fields:
- Project ID
- Time-entry date
- Employee
- Task
- Hours
Hit save in the top right.
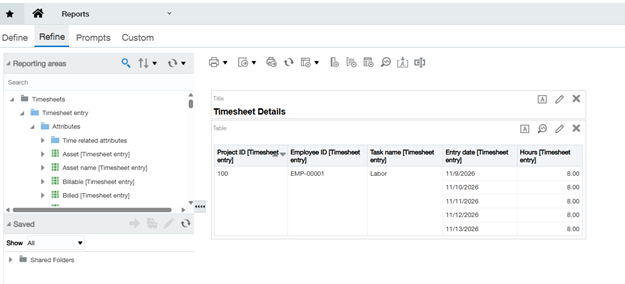
Second report output:
Step Three: Copy and Prepare the SQL Statement
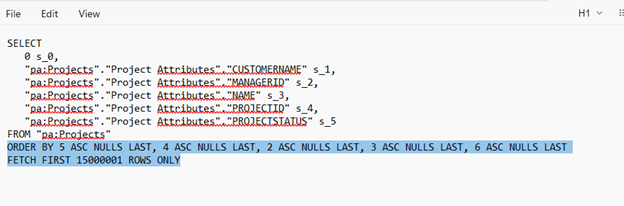
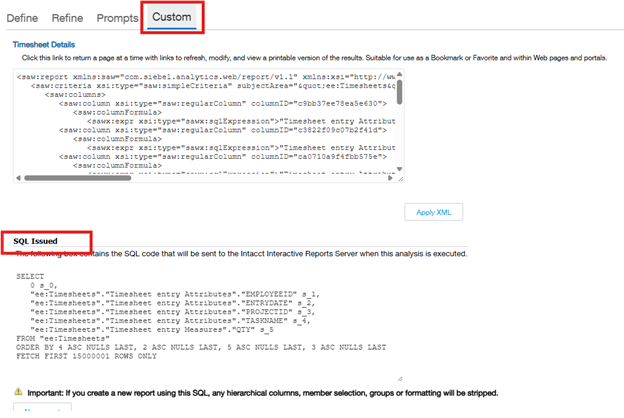
Navigate back to the first report (Projects) > Custom Tab > Locate the SQL Issued Field
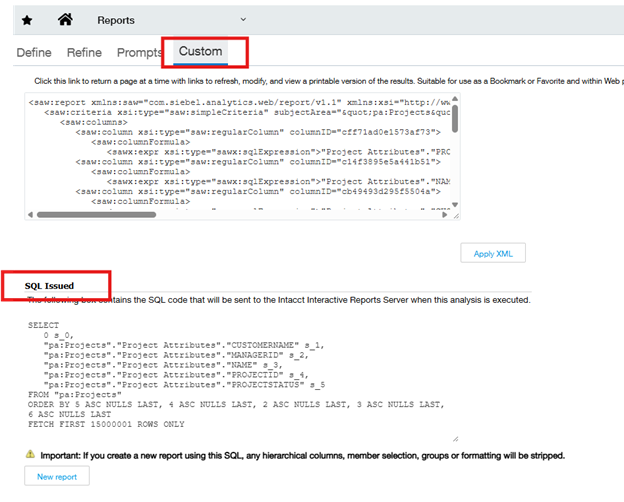
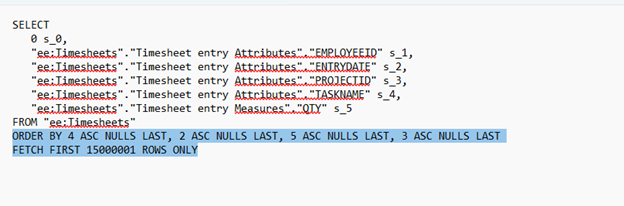
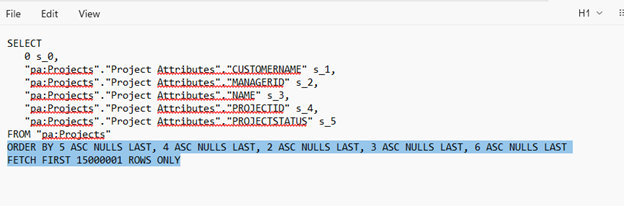
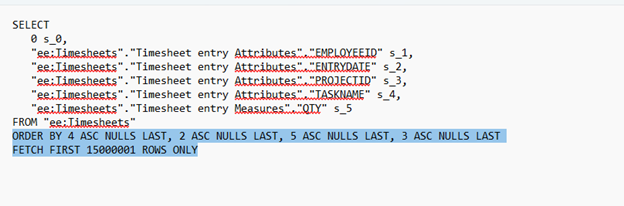
Copy the information from this section and paste it into Notepad (text file). Remove the ORDER BY and FETCH FIRST clauses. ORDER BY controls the display order, and FETCH FIRST limits the number of records returned. Applying either clause before the join can sort or limit the source data prematurely. Add sorting or row limits only after the joined query is working.
Important: The exact reporting-area and field names may differ by Intacct tenant. Copy the SQL generated by your own Projects and Timesheets source reports. Do not manually substitute the example field names unless they match the SQL in your environment.
Navigate to the Timesheets report and repeat this process in a second text file.
Remove the order by and fetch first lines
Step Four: Rename Columns for Joined Report
For the join to work, the selected project identifiers must represent the same value and use compatible formats.
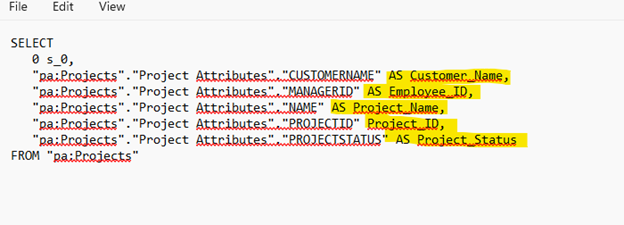
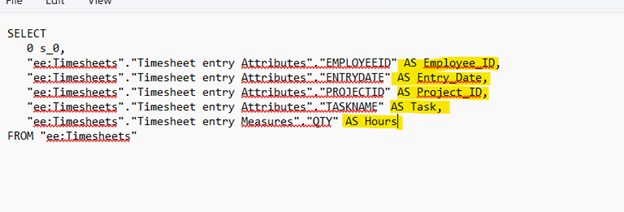
Use AS to assign a column alias, which is a shorter, clearer name used only within the custom SQL report. A column alias does not rename or change the original field in Sage Intacct.
Project_IDfor the Project ID in each reportProject_Name, Customer, Project_Manager,andProject_Statusfor the Projects fieldsEntry_Date, Employee, Task,andHoursfor the Timesheet fields
Project SQL Before
Project SQL After
Timesheets SQL Before
Timesheets SQL After
Final Result of Step Four:
At this point, you have two separate SQL statements in your text files:
- One pulls project information from the Projects reporting area.
- One pulls time-entry information from the Timesheets reporting area.
Step Five: Create a New Report
Navigate back to your Projects report > custom tab > new report at the bottom of the page. A new custom SQL report will open. Replace the default SQL with the combined query.
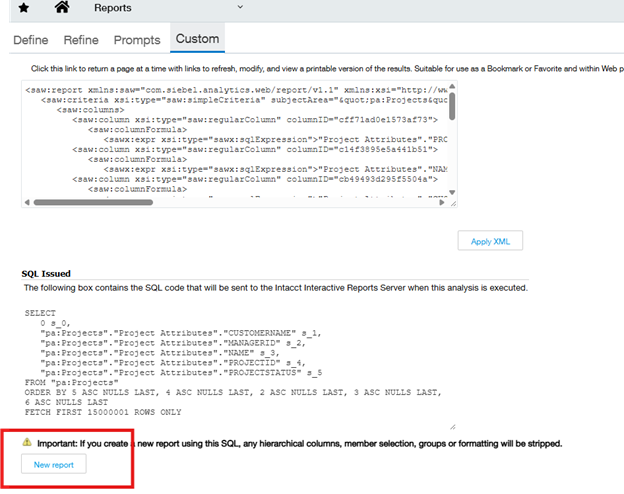
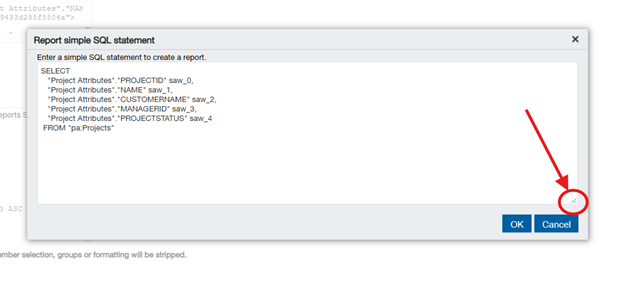
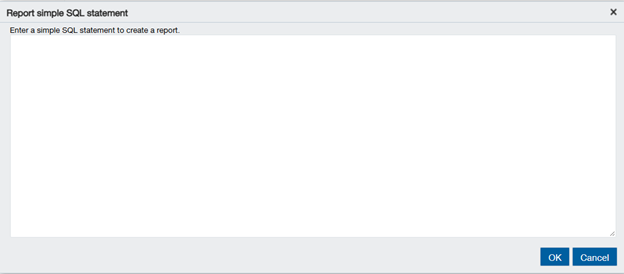
A new SQL entry window will open. You can expand this area in the bottom right corner. Then remove the information that is prepopulated in this screen (you will have a blank SQL area to work with).
New Window Before
New Window After
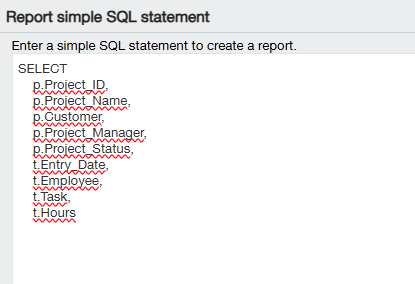
Step Six: Add your SELECT Area
The first SELECT statement determines which columns appear in the final report. The prefixes p. and t. identify which source query supplies each column:
- p. refers to the Projects source query.
- t. refers to the Timesheets source query.
For example, p.Project_Name means “display Project Name from the Projects source query,” while t.Hours means “display Hours from the Timesheets source query.”
Both source queries contain a Project ID. The final report displays p.Project_ID only because the two Project ID values have already been matched in the join condition. Displaying t.Project_ID would usually be redundant.
If you’re working through another example on your own and not using these reporting areas, you can start with any prefix that works for you. For example, if you had a section pulling from the employee record, you could start with “e.”
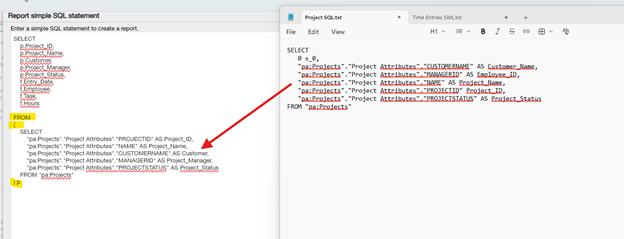
Step Seven: Add the Project Table
Next, we define how the two source report results relate to each other. In SQL terms, each source report is placed in a subquery and assigned an alias (a short name used to refer to that source in the rest of the query).
To do this we will use a FROM statement. This closes with the “p” from our above example. Be sure to include the opening and closing parentheses (highlighted).
Step Eight: Joining Statement
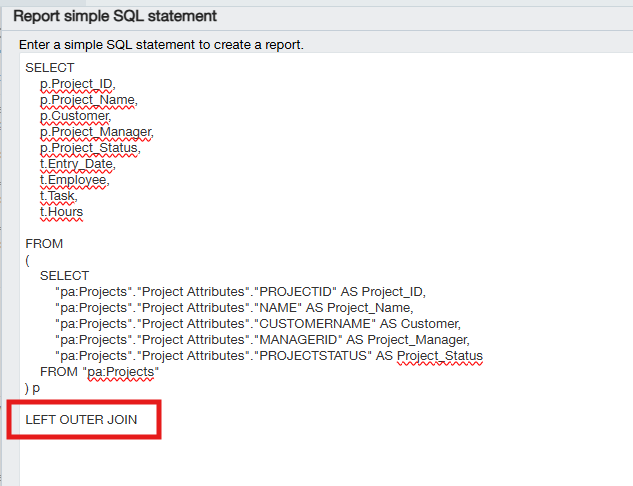
Why we selected a LEFT OUTER JOIN
In this report, the Projects data is the starting point, and the Timesheets data is added when there is a matching Project ID.
A LEFT OUTER JOIN means:
Show every record from the table on the left (Projects) and add matching information from the table on the right (Timesheets) when it is available.
We selected this join because we want the report to include all projects, including projects that do not yet have any time entries.
For example:
|
Project ID |
Project Name |
Time-entry Date |
Employee |
Hours |
|
P-100 |
Office Renovation |
1/10/2026 |
EMP-0001 |
4.00 |
|
P-100 |
Office Renovation |
1/11/2026 |
EMP-0002 |
6.00 |
|
P-101 |
Website Redesign |
— |
— |
— |
Project P-101 appears even though no one has entered time against it. The Timesheets columns are blank because Intacct could not find a matching time entry.
This is useful when reviewing projects because missing time can be meaningful. For example, the project may not have started yet, employees may not have submitted their time, or the Project ID may not have been selected on a time entry.
Other Join Options for this Scenario
|
Join type |
Result |
Best use |
|
LEFT OUTER JOIN |
All Projects and matching Timesheets records |
Use when projects without time entries should remain visible. |
|
INNER JOIN |
Only Projects with matching Timesheets records |
Use when the report should show only projects with recorded time. |
|
RIGHT OUTER JOIN |
All Timesheets records and matching Projects records |
Use when time entries are the primary focus, including entries that may not match a project. |
|
FULL OUTER JOIN |
All Projects and all Timesheets records, matched where possible |
Useful for data-quality review; availability should be confirmed in the specific ICRW environment. |
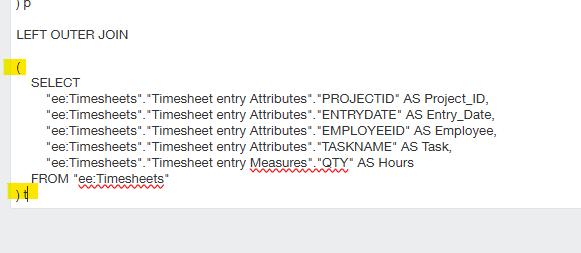
Step Nine: Add Timesheets Table
Now that we have our join statement, we can add the Timesheets table. Don’t forget to add your open and close parentheses.
Step Ten: Select the Joining ID
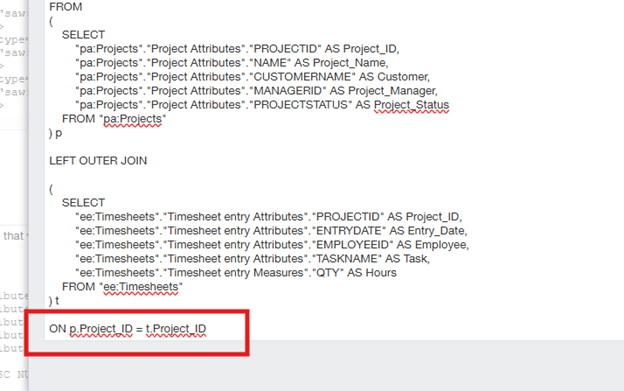
The last step is to define the join condition (the field used to match the two source queries). We are joining the areas by project ID. Make sure to include the “p” and the “t” to note where the information is coming from.
ON p.Project_ID = t.Project_ID
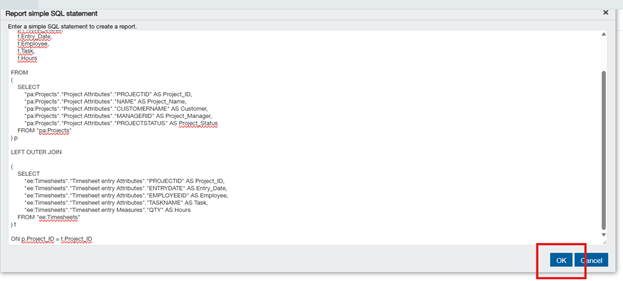
Step Eleven: Your Final Report
The last step is to hit “okay”, and a new report will open displaying the information from both reporting areas.
Final Output:
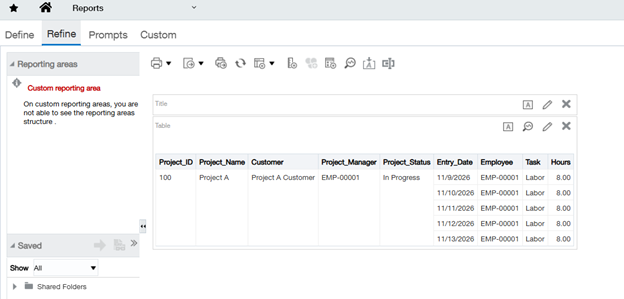
Notice how the reporting area has now updated to “custom reporting area.”
Save the report before leaving ICRW.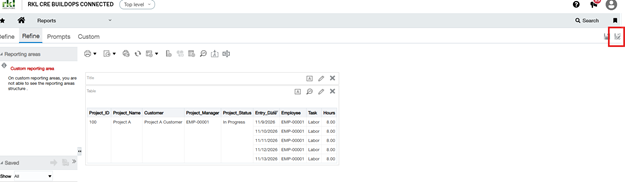
Save the report in your company’s shared folder rather than the Intacct Library.
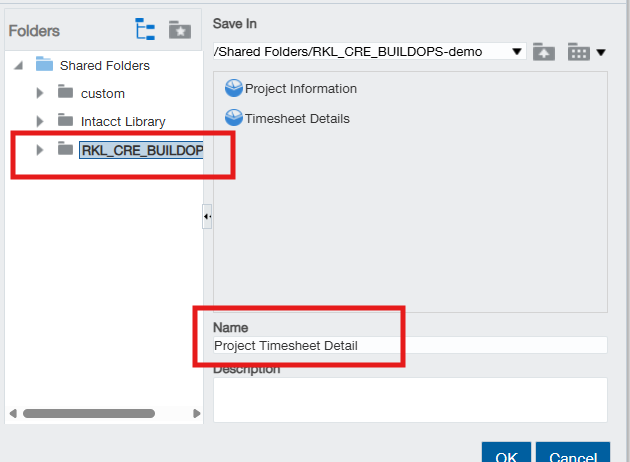
You have now joined the Sage Intacct Projects and Timesheets reporting areas in ICRW using SQL. The completed report combines project-level information with related time-entry details and retains projects that do not yet have recorded time.
Step Twelve: Data Validation
Data validation is an important final step for all custom reports. Always select a sample of records and verify the results against the corresponding records in Intacct. In our example, we would want to verify the timesheets have no duplicated lines or incorrect hours.
Looking for More on Sage Intacct?
For more helpful tips and tricks about Sage Intacct, subscribe to our blog and stay up-to-date with our latest tutorials. We're dedicated to providing valuable resources for businesses looking to optimize their financial management with Sage Intacct.
 Check out these blogs to help get you started!
Sage Intacct R4 2026: What You Need to Know about the Latest Release
Turn Financial Data Into Decisions with Sage Intacct’s Finance Intelligence Agent
Create Expanded Columns and a Summary for Reports in Sage Intacct