I see a lot of Sage 500 ERP questions related to how to see what permissions a user has. I also see a lot of questions around the area of creating a BI view within Sage 500. I am going to use these 2 questions in my post today and provide a step by step example of how to solve both of these questions. I have posted the View before in the Community Forums so you might have seen this before.
You will want to open SQL Server Management Studio. Then select the Sage 500 ERP database and open a SQL Query Window, similar to the screen shot below.
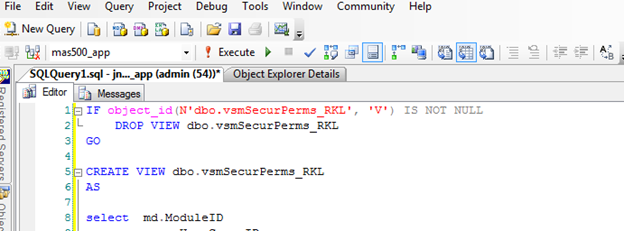
Copy the SQL Script below into your Query window and Execute this by clicking on the Execute button or pressing F5.
Script to create SQL View (make sure you are in the Sage 500 ERP database)
IF object_id(N'dbo.vdvSecurPerms_RKL', 'V') IS NOT NULL
DROP VIEW dbo.vdvSecurPerms_RKL;
GOCREATE VIEW dbo.vdvSecurPerms_RKL
AS
select md.ModuleID
, ug.UserGroupID
, case
ISNULL(sem.Authorized,0)
when 0 then 'No'
when 1 then 'Yes'
end as 'Permission'
, ls.LocalText as Description
, 'Event' as SecType
from tsmusergroup ug with (nolock)
cross join tsmSecurEvent se with (nolock)
inner join tsmModuleDef md with (nolock)
on md.ModuleNo = se.ModuleNo
left outer join tsmSecurEventPerm sem with (nolock)
on se.SecurEventID = sem.SecurEventID and sem.UserGroupID = ug.UserGroupID
inner join tsmLocalString ls with (nolock)
on se.DescStrNo = ls.StringNo
UNION ALL
select md.ModuleID
, ug.UserGroupID
, case tp.Rights
when 1 then 'Excluded'
when 2 then 'Display Only'
when 3 then 'Normal'
when 4 then 'Supervisory'
else 'Excluded'
end as 'Rights'
, tsd.TaskLongName
, 'Task' As SecType
from tsmUserGroup ug with (nolock)
cross join tsmTask t with (nolock)
left outer join tsmTaskPerm tp with (nolock)
on ug.UserGroupID = tp.UserGroupID and tp.TaskID = t.TaskID
join tsmModuleDef md with (nolock)
on t.ModuleNo = md.ModuleNo
join tsmTaskTypeDef ttd with (nolock)
on t.TaskTypeID = ttd.TaskTypeID
join tsmModuleStrDef msd with (nolock)
on t.ModuleNo = msd.ModuleNo
join tsmTaskStrDef tsd with (nolock)
on t.TaskID = tsd.TaskID;
GOGRANT SELECT ON dbo.vdvSecurPerms_RKL TO ApplicationDBRole;
GO
Script to execute SQL View
This is just to view the results to make sure we get what was expected.
select
*
from vdvSecurPerms_RKL;
Create a BI Task in Sage 500 ERP
Well assuming all went well up until now, the next step is to add this to the Sage 500 ERP Business Desktop. We will now launch the Sage 500 ERP client. I named the view starting with 'vdv' above because this is a requirement of Sage 500 ERP for use with the BI engine. You can read more about that at http://www.rklesolutions.com/wp-content/uploads/2013/06/Sage-500-ERP-Custom-Views-Business-Insights.pdf. Here is some additional information related to how to copy an existing Sage 500 ERP 'vdv' as a starting point http://www.rklesolutions.com/wp-content/uploads/2013/06/Sage-500-ERP-create-copy-existing-vdv-entity.pdf.
You must first decide where you want the BI to reside. As a rule of thumb whenever I am creating any custom views on the Desktop I like to create my own folder this way it keeps the menu clean.
So with that in mind I would go the the Business Insights module and right-click in the frame, select Create New Task and Folder, as shown below. Sorry it is a little bit cloudy but you should get the idea. Then I would name the Folder something like 'My Custom Views'.

Create a new Folder.

Name the Folder.
Adding the BI View
Now you can add the new BI View by navigating to the System Manager > Maintenance > Maintain Business Insights Views / Context Menus.
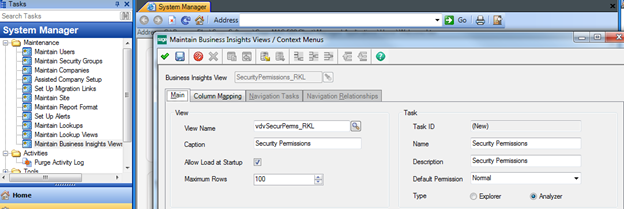
The first thing you need to do is provide your new view with a name. I have called my example SecurityPermissions_RKL. If the name was already in use it would have retrieved that View.
Next you can either key in or select from the lookup the View Name. I keyed in vdvSecurPerms_RKL, which is the name of the view we created earlier. Now provide a Caption to correspond with this View. The Caption value you enter will default into the Name and Description field. You can change these values if you like. I have left the Allow Load at Startup checked as well as the Default Permission.
I did key in 100 for the Maximum Rows. This is new in MAS 500 v7.4. Thank you Sage for this one!
I have also elected to make this a Type of Analyzer. This basically says that I am not mapping this View to any additional child records for drilling purposes. You should have noticed that when you click on the Analyzer radio button that 2 of the tabs on this form are no longer accessible. They are Navigation Tasks and Navigation Relationships.
The only tab remaining is Column Mapping and for the purpose of this exercise I am not changing anything. If you wish to know more about this form you can visit the help on online documentation.
Now Save your changes and close this form.
Adding BI View as a Task to the Business Desktop
The last step is to return to our Custom Folder right-click select Create New Task then Sage ERP MAS 500 Task from the context-menu. This will launch the form shown below only without the values.
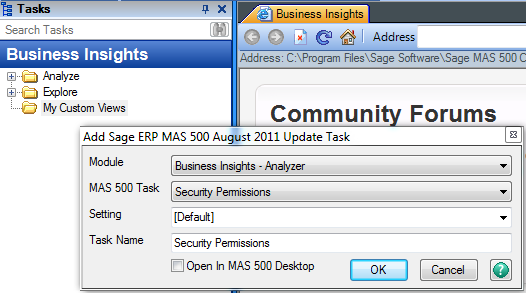
Select the Module…in my example I had place my View in the BI – Analyzer category, you may have used BI – Explorer. Then select your Sage 500 ERP Task. This is the name you entered in the Caption earlier. The Setting and the Task Name will populate automatically. Click OK. You should see something like below, depending on where you placed this in your Desktop.

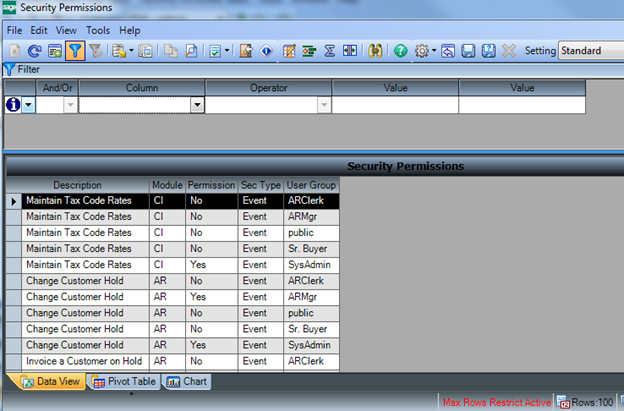
You can now launch the task by double-clicking. Your new view should look something like the image below. You now have all the functionality for this view that you would for any other BI in Sage 500 ERP.
I have 2 things I want to point out to you on the screen below. Notice in the bottom right corner the Rows:100. This is because of the value that I entered when I created my BI View earlier. The Max Rows Restrict Active is also because of that as well. This is very handy when a user may call you and say not all of the information is showing. If you want to get all of the rows you can simply click on the Show All icon on the Analyzer Toolbar. It is the 3rd icon from the left on the toolbar in the image below.
Thanks for reading. I hope you found this helpful.