We have recently assisted several customers in moving their Sage ERP X3 databases to new locations. The reasons for the moves were different and somewhat irrelevant but just to give you point of reference example let’s say they ran out of space on their current server disks so they purchased an external disk system. Another example is that the current system configuration was not adequate for the system to deliver the performance they should expect.
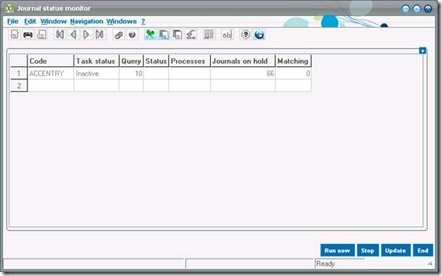
Step 1: Stop the Journal Status Monitor in Sage ERP X3
a. Usage->Batch Server->Accounting Tasks
b. Click the Stop button on the Journal Status Monitor
Step 2: Stop the Batch Server in X3
a. Usage->Batch Server->Server deactivation
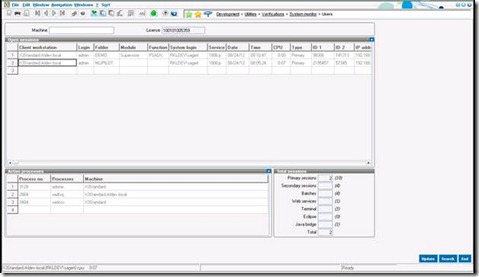
Step 3: Make sure all user sessions and processes are ended
a. For X3 v5 - Development->Utilities->Verifications->User Monitor
b. For X3 v6 - Development->Utilities->Verifications->System Monitor->Users
c. Right-click the Active Processes and choose Process Termination
Step 4: Backup the databases to prepare for Move of Databases
a. Log out of X3
b. Do a full backup of the Sage ERP X3 database in SQL Server
Step 5: Move the Database files
a. Perform the actions using the following SQL Script to move the various Database Files to a new location and detach/attach the Sage ERP X3 database
<span id="lnum1" style="color: #606060;"> 1:</span> <span style="color: #008000;">/*</span>
<span id="lnum2" style="color: #606060;"> 2:</span>
<span id="lnum3" style="color: #606060;"> 3:</span> <span style="color: #008000;">PURPOSE: Move SQL Server Database Files</span>
<span id="lnum4" style="color: #606060;"> 4:</span>
<span id="lnum5" style="color: #606060;"> 5:</span> <span style="color: #008000;">NOTE: In the scripts example below I am placing TempDB on Drive D:, database file on Drive F: and Log file on Drive L:</span>
<span id="lnum6" style="color: #606060;"> 6:</span>
<span id="lnum7" style="color: #606060;"> 7:</span> <span style="color: #008000;">*/</span>
<span id="lnum8" style="color: #606060;"> 8:</span>
<span id="lnum9" style="color: #606060;"> 9:</span> <span style="color: #008000;">-- Change the TempDB files to their own directory</span>
<span id="lnum10" style="color: #606060;"> 10:</span> <span style="color: #008000;">/*</span>
<span id="lnum11" style="color: #606060;"> 11:</span> <span style="color: #008000;"> a. It is preferred that the Data files and Log files are on seperate physical disks and RAID controllers for optimal performance</span>
<span id="lnum12" style="color: #606060;"> 12:</span> <span style="color: #008000;"> b. For optimal performance you would not put more than one LDF file on the same disk and RAID controller</span>
<span id="lnum13" style="color: #606060;"> 13:</span> <span style="color: #008000;"> c. It is not recommended that these disks contain files serving any other purpose such as storing files, programs or backups</span>
<span id="lnum14" style="color: #606060;"> 14:</span> <span style="color: #008000;"> d. I would make sure that you exclude these file paths or at least file extensions from any Anti-virus scanning package you might have</span>
<span id="lnum15" style="color: #606060;"> 15:</span>
<span id="lnum16" style="color: #606060;"> 16:</span> <span style="color: #008000;">NOTE: Before performing the steps below make sure you change the database, file and path names to correspond with your configuration.</span>
<span id="lnum17" style="color: #606060;"> 17:</span>
<span id="lnum18" style="color: #606060;"> 18:</span> <span style="color: #008000;">Steps below include:</span>
<span id="lnum19" style="color: #606060;"> 19:</span> <span style="color: #008000;"> 1. Alter the database path for the tempdb files</span>
<span id="lnum20" style="color: #606060;"> 20:</span> <span style="color: #008000;"> 2. Restart SQL Services</span>
<span id="lnum21" style="color: #606060;"> 21:</span> <span style="color: #008000;">*/</span>
<span id="lnum22" style="color: #606060;"> 22:</span>
<span id="lnum23" style="color: #606060;"> 23:</span> <span style="color: #0000ff;">use</span> master
<span id="lnum24" style="color: #606060;"> 24:</span> <span style="color: #0000ff;">go</span>
<span id="lnum25" style="color: #606060;"> 25:</span> <span style="color: #0000ff;">Alter</span> <span style="color: #0000ff;">database</span> tempdb <span style="color: #0000ff;">modify</span> <span style="color: #0000ff;">file</span> (name = tempdev, filename = <span style="color: #006080;">'D:SqlTempDBtempdb.mdf'</span>)
<span id="lnum26" style="color: #606060;"> 26:</span> <span style="color: #0000ff;">go</span>
<span id="lnum27" style="color: #606060;"> 27:</span> <span style="color: #0000ff;">Alter</span> <span style="color: #0000ff;">database</span> tempdb <span style="color: #0000ff;">modify</span> <span style="color: #0000ff;">file</span> (name = templog, filename = <span style="color: #006080;">'D:SQLTempDBtemplog.ldf'</span>)
<span id="lnum28" style="color: #606060;"> 28:</span> <span style="color: #0000ff;">go</span>
<span id="lnum29" style="color: #606060;"> 29:</span>
<span id="lnum30" style="color: #606060;"> 30:</span>
<span id="lnum31" style="color: #606060;"> 31:</span> <span style="color: #008000;">-- Change the User Database files to their own directory</span>
<span id="lnum32" style="color: #606060;"> 32:</span> <span style="color: #008000;">/*</span>
<span id="lnum33" style="color: #606060;"> 33:</span> <span style="color: #008000;"> a. It is acceptable to have the data and log files on the same physical disk and RAID controller</span>
<span id="lnum34" style="color: #606060;"> 34:</span> <span style="color: #008000;"> b. For optimal performance you could create additional tempdb data files (this something to discuss and experiment with after a baseline is established)</span>
<span id="lnum35" style="color: #606060;"> 35:</span> <span style="color: #008000;"> - If you create additional tempdb data files they must all be the same size and the growth rate must be the same</span>
<span id="lnum36" style="color: #606060;"> 36:</span> <span style="color: #008000;"> c. It is not recommended that these disks contain files serving any other purpose such as storing files, programs or backups</span>
<span id="lnum37" style="color: #606060;"> 37:</span> <span style="color: #008000;"> d. I would make sure that you exclude these file paths or at least file extensions from any Anti-virus scanning package you might have</span>
<span id="lnum38" style="color: #606060;"> 38:</span>
<span id="lnum39" style="color: #606060;"> 39:</span> <span style="color: #008000;">NOTE: Before performing the steps below make sure you change the database, file and path names to correspond with your configuration.</span>
<span id="lnum40" style="color: #606060;"> 40:</span>
<span id="lnum41" style="color: #606060;"> 41:</span> <span style="color: #008000;">Steps below include:</span>
<span id="lnum42" style="color: #606060;"> 42:</span> <span style="color: #008000;"> 1. Detach the database in SQL Server</span>
<span id="lnum43" style="color: #606060;"> 43:</span> <span style="color: #008000;"> 2. From Windows Explorer move the physical files to their respected new drives/paths</span>
<span id="lnum44" style="color: #606060;"> 44:</span> <span style="color: #008000;"> 3. Attach the database in SQL Server</span>
<span id="lnum45" style="color: #606060;"> 45:</span>
<span id="lnum46" style="color: #606060;"> 46:</span> <span style="color: #008000;">*/</span>
<span id="lnum47" style="color: #606060;"> 47:</span>
<span id="lnum48" style="color: #606060;"> 48:</span> <span style="color: #008000;">-- Detach the database (e.g. this is database X3V5</span>
<span id="lnum49" style="color: #606060;"> 49:</span> <span style="color: #0000ff;">use</span> master
<span id="lnum50" style="color: #606060;"> 50:</span> <span style="color: #0000ff;">go</span>
<span id="lnum51" style="color: #606060;"> 51:</span> sp_detach_db <span style="color: #006080;">'X3V5'</span>
<span id="lnum52" style="color: #606060;"> 52:</span> <span style="color: #0000ff;">go</span>
<span id="lnum53" style="color: #606060;"> 53:</span>
<span id="lnum54" style="color: #606060;"> 54:</span> <span style="color: #008000;">-- Move the physical files in Windows Explorer to the appropriate locations</span>
<span id="lnum55" style="color: #606060;"> 55:</span>
<span id="lnum56" style="color: #606060;"> 56:</span> <span style="color: #0000ff;">Use</span> Master
<span id="lnum57" style="color: #606060;"> 57:</span> sp_attach_db <span style="color: #006080;">'X3V5'</span>,<span style="color: #006080;">'F:SQLDataMSSQLDataX3V5.mdf'</span>,<span style="color: #006080;">'L:SQLLogX3V5_log.ldf'</span>
<span id="lnum58" style="color: #606060;"> 58:</span> <span style="color: #0000ff;">go</span>
<span id="lnum59" style="color: #606060;"> 59:</span>
<span id="lnum60" style="color: #606060;"> 60:</span>
<span id="lnum61" style="color: #606060;"> 61:</span> /* <span style="color: #0000ff;">If</span> you want <span style="color: #0000ff;">to</span> move the base <span style="color: #0000ff;">SQL</span> Server <span style="color: #0000ff;">database</span> files
<span id="lnum62" style="color: #606060;"> 62:</span> --<span style="color: #0000ff;">Add</span> the -T3608 startup <span style="color: #0000ff;">parameter</span> <span style="color: #0000ff;">and</span> stop <span style="color: #0000ff;">and</span> restart <span style="color: #0000ff;">SQL</span>
<span id="lnum63" style="color: #606060;"> 63:</span>
<span id="lnum64" style="color: #606060;"> 64:</span> <span style="color: #0000ff;">use</span> master
<span id="lnum65" style="color: #606060;"> 65:</span> <span style="color: #0000ff;">go</span>
<span id="lnum66" style="color: #606060;"> 66:</span> sp_detach_db <span style="color: #006080;">'msdb'</span>
<span id="lnum67" style="color: #606060;"> 67:</span> <span style="color: #0000ff;">go</span>
<span id="lnum68" style="color: #606060;"> 68:</span> sp_detach_db <span style="color: #006080;">'model'</span>
<span id="lnum69" style="color: #606060;"> 69:</span> <span style="color: #0000ff;">go</span>
<span id="lnum70" style="color: #606060;"> 70:</span>
<span id="lnum71" style="color: #606060;"> 71:</span> --Move the files <span style="color: #0000ff;">in</span> Windows exporer <span style="color: #0000ff;">to</span> the appropriate locations
<span id="lnum72" style="color: #606060;"> 72:</span>
<span id="lnum73" style="color: #606060;"> 73:</span> <span style="color: #0000ff;">use</span> Master
<span id="lnum74" style="color: #606060;"> 74:</span> <span style="color: #0000ff;">go</span>
<span id="lnum75" style="color: #606060;"> 75:</span> sp_attach_db <span style="color: #006080;">'model'</span>,<span style="color: #006080;">'F:SQLDataMSSQLDatamodel.mdf'</span>,<span style="color: #006080;">'D:SQLLogmodellog.ldf'</span>
<span id="lnum76" style="color: #606060;"> 76:</span> <span style="color: #0000ff;">go</span>
<span id="lnum77" style="color: #606060;"> 77:</span>
<span id="lnum78" style="color: #606060;"> 78:</span> --Remove the Startup <span style="color: #0000ff;">Parameter</span> -T3608 added above
<span id="lnum79" style="color: #606060;"> 79:</span> <span style="color: #0000ff;">use</span> Master
<span id="lnum80" style="color: #606060;"> 80:</span> <span style="color: #0000ff;">go</span>
<span id="lnum81" style="color: #606060;"> 81:</span> sp_attach_db <span style="color: #006080;">'msdb'</span>,<span style="color: #006080;">'F:SQLDataMSSQLDatamsdbdata.mdf'</span>,<span style="color: #006080;">'D:SQLLogmsdblog.ldf'</span>
<span id="lnum82" style="color: #606060;"> 82:</span> <span style="color: #0000ff;">go</span>
<span id="lnum83" style="color: #606060;"> 83:</span>
<span id="lnum84" style="color: #606060;"> 84:</span> */
Step 6: Modify the XML files used by SAFE X3 VI console
In Windows on the Database server, find the Sage ERP X3 installation folders
a. C:SageSageX3ADXADMINinst (default path in v6)
b. Open the Adx_sqlserveur.xml file in notepad and change the following paths
<component.database.path>C:SAGESAGEX3V6X3V6database</component.database.path>
<database.adonix.sqldirdat>C:SAGESAGEX3V6X3V6databasedata</database.adonix.sqldirdat>
<database.adonix.sqldirlog>C:SAGESAGEX3V6X3V6databaselog</database.adonix.sqldirlog>
c. Open the adxinstalls.xml file in notepad and change the following paths
<component.database.path>C:SAGESAGEX3V6X3V6database</component.database.path>
<database.adonix.sqldirdat>C:SAGESAGEX3V6X3V6databasedata</database.adonix.sqldirdat>
<database.adonix.sqldirlog>C:SAGESAGEX3V6X3V6databaselog</database.adonix.sqldirlog>
Step 7: Launch the SAFE X3 VI console
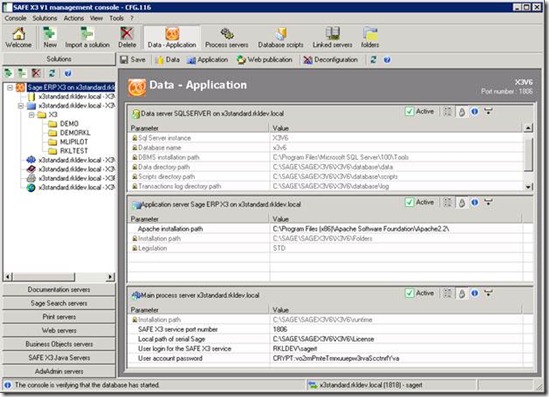
a. Open the X3 Console application (must be logged in as the installation user i.e. sagert)
b. The Data – Application screen should show the database is still Active, but the new paths for the data and log files in the database section
c. Click the Save icon to configure the new database location
d. Close out of the Console
Step 8: Post changes backup of Database
a. Do a full backup of the X3 database
b. Modify the backup jobs to point to a new backup path
c. Restart SQL Services to make sure everything mounts okay
d. Login into X3 to make sure it connects


