Sage ERP X3 has a lot of functionality and flexibility but the one thing that I am not fond of is the lack of support for shortcut keys. So that means I try to get as much information on the Window as possible to limit the amount of mouse movements and mouse clicks.
The cosmetic enhancement that I am about to describe in this post is just make users more efficient.
The issue at hand is that a user in Customer Service needs flexible customer search capabilities along with the need to look at the customer's previous purchases then quickly go into create a Quote or Order. The Customer Search window is a great multipurpose customer search tool, as shown in figure 1.

Figure 1: Customer Search window
Yes I am aware that once you have searched and found a Customer on this window that you can click on one of the results rows, then click on the menu Inquiries > Invoices > Lines. This will also deliver the desired result that I am trying to accomplish. However I personally feel that is way too much mouse activity to be productive.
Another way to use the Customer Search is if you bring back a list of customers you can then point your mouse to a cell in the Customer column and double-click this enables all the buttons available on the window as shown in Figure 2. From this form you can click on Order which would take you to the Orders window where you can select a previous order to view or copy, you can also just create a new order right there then return to the Customer Search window.

Figure 2: Enabled buttons after doing a Customer Search
This is what gave me the idea to add a button for Invoice Lines Inquiry as well to this form. So we need navigate to the Development > Processes > Windows task and select XCUSSCH as shown in figure 3. This is the form we wish to enhance.
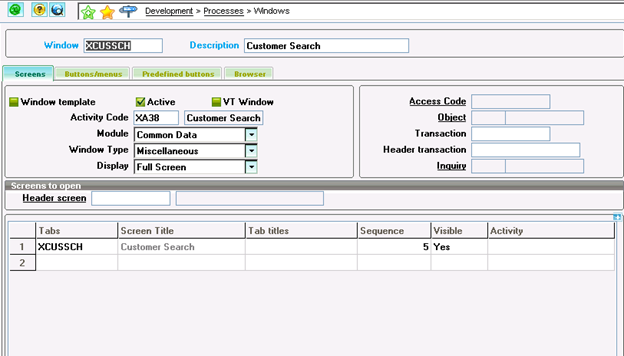
Figure 3: Development mode Customer Search window
Then we need to go to the Buttons/menus tab. You can just add the new Button to the bottom of the list. So scroll down the list to the next open row and enter the information as shown in figure 4 row 51.
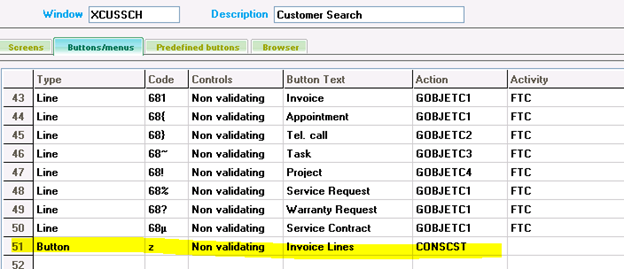
Figure 4: Add a new Button to the Customer Search window
The one thing to keep in mind is that the Code column must be unique. I assigned an arbitrary 'z' because I knew it was not in use by any of the other 50 rows.
The one often overlooked but important step is to click on the Save button and then click on the Validation button. Without this you will not see your changes.
Your new window should contain the Invoice Lines button as shown in figure 5. The Invoice Lines button is highlighted in yellow.

Figure 5: Customer Search window with Invoice Lines button.
I hope you found this helpful. As always feel free to reach out to me with comments.