This process describes importing of transactions from two different systems. The first example is a Point of Sale (POS) system. The second example is an eCommerce system. They are both disparate systems. The assumption in this is example is that the transactions are being exported on a daily basis from the respected source system. The import jobs in these examples are used to bring the transactions into Sage ERP X3 on a daily basis.
In the steps described below I also realize that once you are logged into Sage ERP X3 that you would just be switching functions and it would not require you to log in each time. I just did that to avoid any confusion if you were beginning at just that step. I have also not supplied any of the SSIS scripts to massage the example files. Your instance may not require any massaging of files.
POS Import:
Create the Files to import: (this is just for this example and your unique situation may differ)
- Generate a data file from POS for invoices to import called "LS POS.txt" and place it on the X3 server at servernameX3V6DOC
- Generate a data file from POS for payments to import called "Payments_(To_Import).iif" and place it on the X3 server at servername X3V6DOC
-
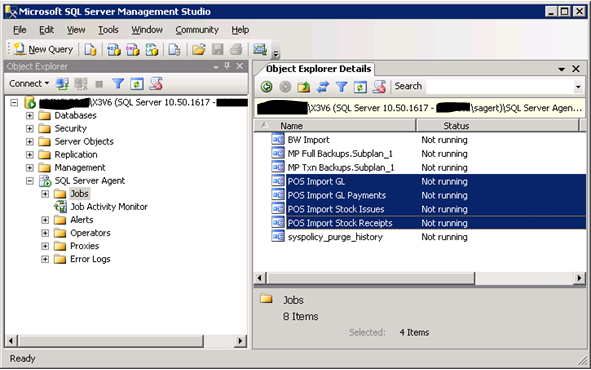
Run the following jobs in SQL Server to manipulate the files for import into Sage ERP X3:
- POS Import Stock Issues: Creates file for Miscellaneous Stock Issues in Sage ERP X3 (all line items with a positive quantity on the invoice)
- POS Import Stock Receipts: Creates file for Miscellaneous Stock Receipts in Sage ERP X3 (all line items with a negative quantity on the invoice)
- POS Import GL: Creates file for a summarized GL Posting for everything in the LS POS.txt source
- POS Import GL Payments: Creates file for a summarized GL Posting for everything in the Payments_(To_Import).iif source
NOTE: The 4 SQL Jobs outlined above are SSIS scripts created to manipulate the file format to from the POS system to the layout of the Sage ERP X3 import format. This step may not be necessary if you have the files already in the format for the import routines. These jobs can be manually executed from SQL Server Management Studio, or scheduled to automatically run on a set schedule.
Import the data into Sage ERP X3:
Template "SMO" – Imports the Miscellaneous Stock Issues:
-
Log into Sage ERP X3 and go to Usage -> Imports /Exports -> Imports
- Key in "SMO" in the template field
- Choose Server as the location and Tab to enter the path to the data located at C:SageSageX3V6X3V6DOCLSPOSX3.txt
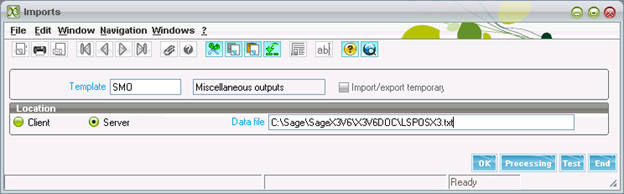
- Click OK to import the data into Sage ERP X3
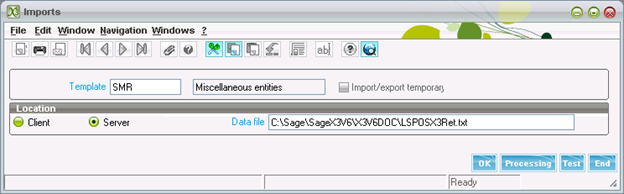
Template "SMR" – Imports the Miscellaneous Stock Receipts:
-
Log into Sage ERP X3 and go to Usage -> Imports/Exports -> Imports
- Key in "SMR" in the template field
- Choose Server as the location and Tab to enter the path to the data located at C:SageSageX3V6X3V6DOCLSPOSX3Ret.txt
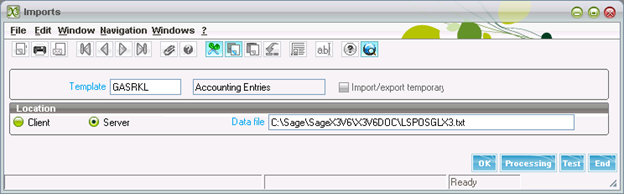
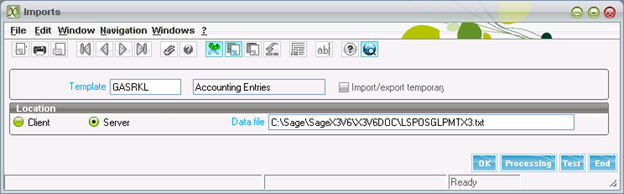
Template "GASRKL" – Imports the Summarized GL for the POS Invoices and Payments:
-
Log into Sage ERP X3 and go to Usage -> Imports/Exports -> Imports
- Key in "GASRKL" in the template field
- Choose Server as the location and Tab to enter the path to the data located at C:SageSageX3V6X3V6DOCLSPOSGLX3.txt
-
Log into Sage ERP X3 and go to Usage -> Imports/Exports -> Imports
- Key in "GASRKL" in the template field
- Choose Server as the location and Tab to enter the path to the data located at C:SageSageX3V6X3V6DOCLSPOSGLPMTX3.txt
eCommerce Site Import:
Create the File to import:
- Generate data files from the eCommerce site for sales orders to import called "OrderHeader.txt" and "OrderDetail.txt" and place it on the X3 server at servernameX3V6DOC
-
Run the following job in SQL Server to manipulate the files for import into Sage ERP X3:
- BW Import: Create file for Sales Orders in Sage ERP X3
NOTE: The 1 SQL Job1 outlined above are SSIS scripts created to manipulate the file format to from the eCommerce site to the layout of the Sage ERP X3 import format. This step may not be necessary if you have the files already in the format for the import routines. These jobs can be manually executed from SQL Server Management Studio, or scheduled to automatically run on a set schedule.

Import the data into Sage ERP X3:
-
Log into Sage ERP X3 and go to Usage -> Imports/Exports -> Imports
- Key in "SOHFL" in the template field
- Choose Server as the location and Tab to enter the path to the data located at C:SageSageX3V6X3V6DOCBWOrderX3.txt
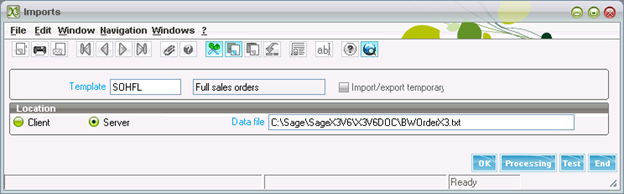
- Click OK to import the data into Sage ERP X3