
In order to use Office 365 with your Sage 500 ERP eBusiness Suite, you will need to make several configuration changes on Office365.com as well as on your eBusiness Suite host server. The changes will be made on the server hosting the User Interface. Follow the steps below in order to configure your environment to function.
STEP 1: Configure Office 365 to allow a relay for a specific user
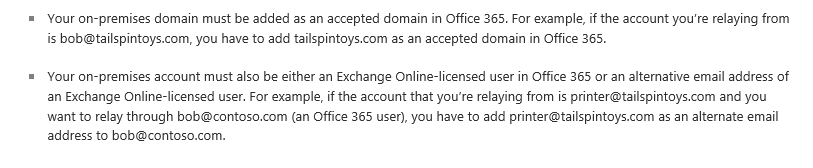 Credit: Microsoft.com
STEP 2: Set up Exchange Online as an SMTP Relay Using Windows Server 2012
1. Install Internet Information Services (IIS)
a. In Server Manager, select Add Roles.
b. On the Before you begin page in the Add Roles Wizard, select Next.
c. On the Select Installation Type page, select Role-based or Feature-based installation.
d. On the Select destination server page, choose Select a server from the server pool, and select the server that will be running SMTP services. Select Next.
e. On the Select Server Roles page, select Web Server (IIS), and then select Next. If a page that requests additional features is displayed, select Add Features and then select Next.
f. On the Select Role Services page, make sure that Basic Authentication under Security is selected, and then select Next.
g. On the Confirm Installation Steps page, select Install.
2. Install SMTP
a. Open Server Manager and select Add Roles and Features.
b. Select Server Selection and make sure that the server that will be running the SMTP server is selected and then select Features.
c. On the Select Features screen, choose SMTP Server. You may be prompted to install additional components. If that’s the case, select Add Required Features and select Next.
d. Select Install. After the installation is finished, you may have to start the SMTP service by using the Services snap-in for the Microsoft Management Console (MMC).
3. Set up SMTP
a. Open Server Manager, select Tools, and then select Internet Information Services (IIS) 6.0.
b. Expand the current server, right-click the SMTP Virtual Server, and then select Properties.
c. On the General tab, select Advanced > Add.
d. In the IP Address box, specify the address of the server that’s hosting the SMTP server.
e. In the Port box, enter 587 and select OK.
f. On the Access tab, do the following:
i. Select Authentication and make sure that Anonymous Access is selected.
ii. Select Connection > Only the List Below, and then specify the IP addresses of the devices that will be connecting to the SMTP server, such as printers.
iii. Select Relay > Only the List Below, and then specify the IP address of the devices relaying through this SMTP server
g. On the Delivery tab, select Outbound Security, and then do the following:
i. Select Basic Authentication.
ii. Enter the credentials of the Office 365 user who you want to use to relay SMTP mail.
iii. Select TLS Encryption.
iv. Select Outbound Connections, and in the TCP Port box, enter 587 and select OK.
v. Select Advanced and specify SMTP.office365.com as the Smart Host.
4. Restart the IIS service and the SMTP service.
STEP 3: Configure eBusiness Suite to send email messages
1. Login to eBusiness Suite as PortalAdmin or an equivalent user.
2. Navigate to Configuration | Configure Portal.
3. Click on Attributes
4. Click Search
5. Scroll down in the list until you see the Email Delivery Method Attribute.
a. Click on the drop down Arrow and choose Network.
6. Scroll down in the list until you see the EMail SMTP Host Attribute.
a. Enter in 127.0.0.1.
7. Scroll down in the list until you see the Email SMTP Port Attribute
a. Enter in 25.
8. Click on the Save Attributes Button at the top of the screen.
9. In the Left List, click on the Email Tester menu option.
10. Once it opens note the settings at the top of the screen. Verify that they are correct.
a. If they are not, or still show blank, logout of eBusiness Suite and log back in and navigate to the screen again.
11. Enter an email address to use in the Email Recipient text box.
12. Enter an email subject in the Email Subject text box.
13. Provide some sort of body for the email in the final box.
14. Click on the Send button to test.
a. Once it returns Success in red, you will have successfully configured the environment.
NOTE: Please note that Antivirus Software will interfere with the forward of e-mail via a relay. You will have to configure your Antivirus software to allow the transactions to flow correctly. Please consult with your Network Administration team if you encounter this issue.
Have Questions or Need Help?
 Click below to get in touch with us here at RKL eSolutions if you have questions about new features or need help with Sage 500 ERP.
Ask a Question