
Lookups are an important function in Sage 100. After all, what good is having all that data in your accounting system if you can’t easily pull it up? However, the default lookups don’t always display exactly what you need so let’s take a look at how to customize your lookup views in Sage 100.
Custom Lookup Views
Anytime you click the magnifying glass icon, it launches into a lookup screen. Whether you’re searching for vendors, customers, accounts, or any other data in Sage 100, lookups are a quick and easy way to find what you need.
But in some cases, hundreds or even thousands of records might display by default, forcing you to spend additional time searching and scrolling. With the following instructions, you can customize the fields, filters, and search criteria to really speed things up:
- From any lookup window (after clicking the magnifying glass icon), choose the Custom button which launches the Lookup Customization Wizard.
- In the View field of the Customization Wizard, select Create New View and give it a name in the description field (or you can select an existing view to modify it).
- Click the Default View checkbox if you’d like this to be the new default lookup. Click Next.
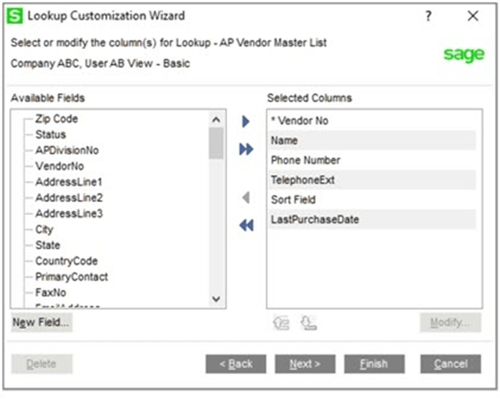
- On the next screen, you can add, remove, modify, and rearrange the order of the columns that display in the lookup. Note that the first column indicated by an asterisk (*) cannot be removed, but can be modified.
- At this point, you can either click Finish if you’re happy with your new customized view or click Next to launch a third options screen to define additional settings to modifying the Filters and further refine the data that will display in your lookup.
- In the last Customization Wizard screen, you can make any final changes and then click Finish to create your new customized lookup view.
Now when you launch your new lookup screen, you’ll notice that the title bar at the top left shows your new description along with an asterisk to indicate that this is a custom view.
Bonus Tip: Exporting Lookup Data
Did you know you can export the data in your new custom lookup to Microsoft Excel? Just click the Excel icon in the lower right corner of your lookup window and voila! The data is exported so you can further slice, dice and analyze.