Do you need to control approval amounts for buyers within Sage X3? There are many steps in order to configure Purchase Order and / or Purchase Request signature workflow in Sage X3. Below highlights some of the steps to get you started.
Purchase signature approval can be set up at the Purchase Order level or the Purchase Request level. You can set up a hierarchy of users that can approve or disapprove the POs and PRs by dollar amount.
For example, User 1 can approve up to $10,000.00. Then User 2 can approve up to $25,000.00, etc.
So if you receive a PO or PR for $15,000.00, User 1 will receive an email to approve or reject the PO/PR. Since it is above $10,000.00, but below 25,000.00 – User 2 also receives an email to approve or reject after user 1 has approved. After this, the approval workflow email process will end and the PO / PR will have been approved and signed or rejected.
Below highlights the steps used to setup and implement purchase signature workflow in Sage X3.
Configure the Signature Parameter
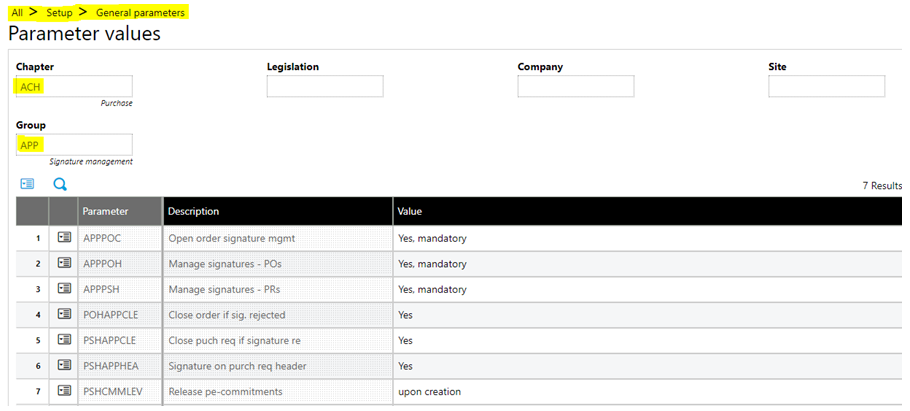
Setup > General Parameters > Parameter Values
Navigate to the ACH Purchase parameter values. You can set the parameters at the folder, legislation, or company level based on your needs. Within the Parameter values for ACH Purchase, select ‘detail’ on the action icon for Group – APP: Signature management. Select your desired parameter values as needed and click ‘OK’ in the right side panel. Make sure to select ‘Save’ in the right side panel after this.
Configure the Workflow Parameter
Setup > General Parameters > Parameter Values
Navigate to the SUP (Supervisor) parameter values. Select the WRK – Workflow parameter value. This parameter is used to setup the directory path used for the workflow. After setting this up, the user (approver / workflow recipient) can approve or reject the PO / PR directly by clicking in the e-mail without actually having to log-in and connect to X3.

The parameter and general setup for the workflow is complete. To setup the approvers, dollar amounts, and workflow details navigate to Setup > Workflow within X3.
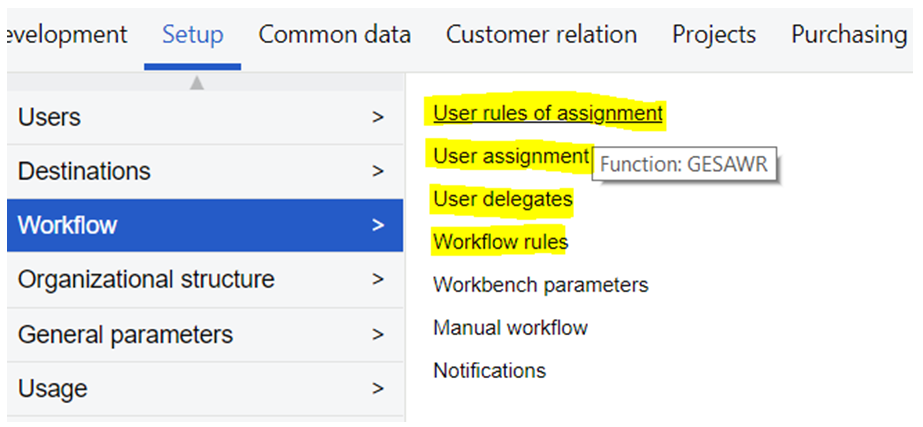
PSHSIG (Purchase request signature) and POHSIG (Purchase order signature) are available pre-set out of the box and a good place to start for the workflow setup. Note: a good common practice is to keep these and add a Y, X, or Z in front of the field to duplicate. This keeps the system organized and allows you to easily track customizations.
User rules of assignment: contains the rules for the tables, fields, and conditions. These are available out of the box (pre-set), but can be modified according to your needs.
User assignment: here you can set you approvers and dollar amounts for the purchase signature workflow.
User delegates: this function allows you to add delegate users to your workflow signature duties in the system. This can be very useful if an approver / signer is sick, absent, on vacation, or out of the office.
Workflow rules: used to define rules, settings, and conditions regarding the workflow.
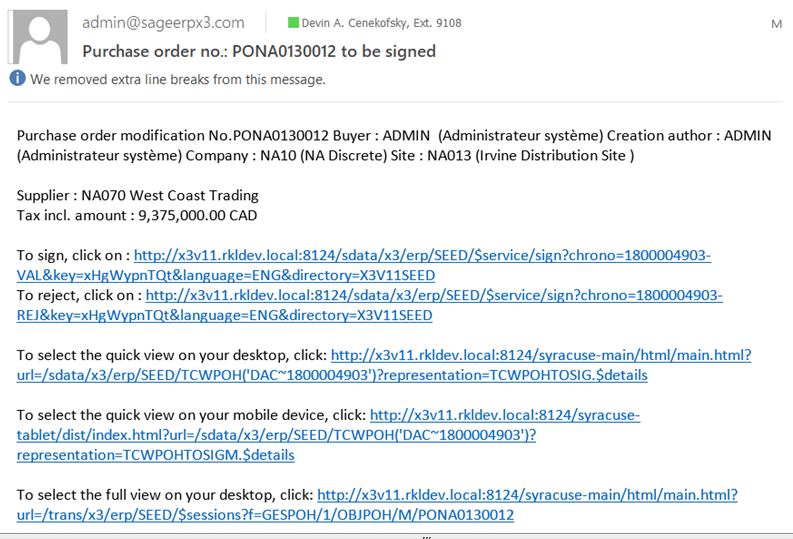
Here's an email example sent to approve:
In conclusion, this guide will serve as a great starting point for setting up and implementing purchase signature workflows in Sage X3. The system is very flexible and offers a lot of workflow options. Also, RKL is able to customize workflows based on your requirements and needs.