As we embrace the digital age, maintaining a streamlined paperless office becomes increasingly important. One task that deserves a spot on your annual to-do list is purging paperless office files. This simple yet impactful action can lead to faster performance in software applications like Sage 100, especially when printing and emailing forms. Additionally, it helps conserve valuable disk space on your hard drive, ensuring your systems run smoothly and efficiently. In this blog, we'll explore the benefits of regularly decluttering your digital files and how it can enhance your office productivity.
How to Purge your Paperless Offices Files in 4 Steps
Step 1: Find out where the PDF files are stored on the network
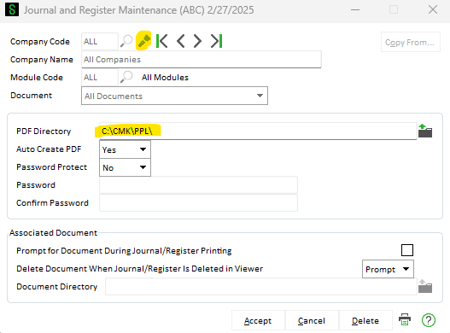
Go To: Paperless Office Module > Setup Menu > Paperless Office Options
- Note which options are used.

- Depending on the options used, go to the "Setup" Menu again and choose the "Maintenance" option for it.
- / Journal and Register Maintenance
- / Period End Report Maintenance
- / Report Maintenance
- / Form Maintenance
-
Click on the FLASHLIGHT (not the magnifying glass) to see what has been set up. Select each option to see what (Module Code and Document), and then see the PDF Directory. You may have many options set up, or there may just be one. You may find some of your options set up are redundant and can be deleted.
-
Highlight and copy the PDF Directory.
-
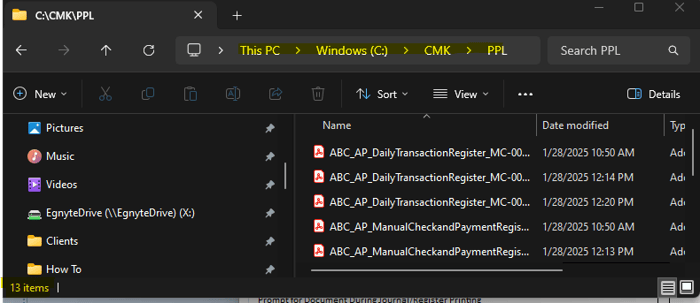
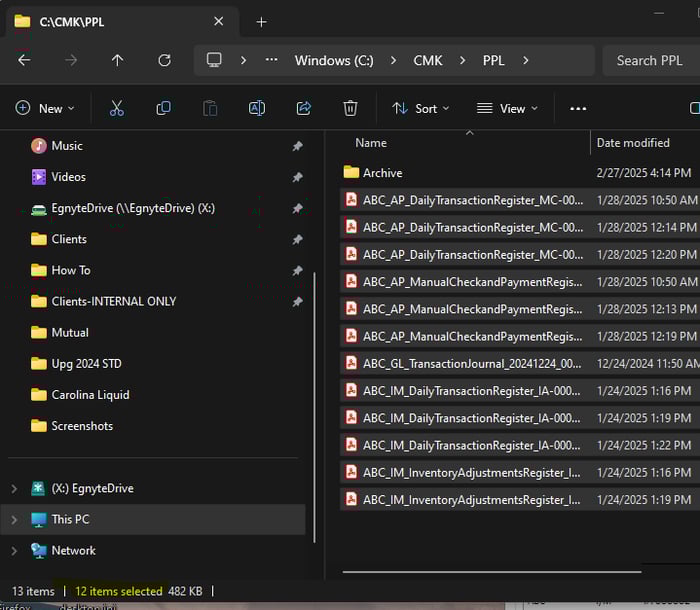
Open Windows Explorer, This PC, or My Computer (depending on your Windows Operating System) and paste the contents of the PDF Directory. In the lower left-hand corner, find the number of objects in the folder - 13 items.
-
If you have over 85,000 PDFs in a folder or if it is slow to open the folder in windows then it is time to Archive, Purge, or create a new folder so that opening the folder in windows is fast. If it is slow in windows, it will be slow in Sage as well.
-
You can manually copy and zip up the PDFs to put in another folder if you would like to keep outside of Sage as a backup just in case.
step 2: Move files to an archive folder
-
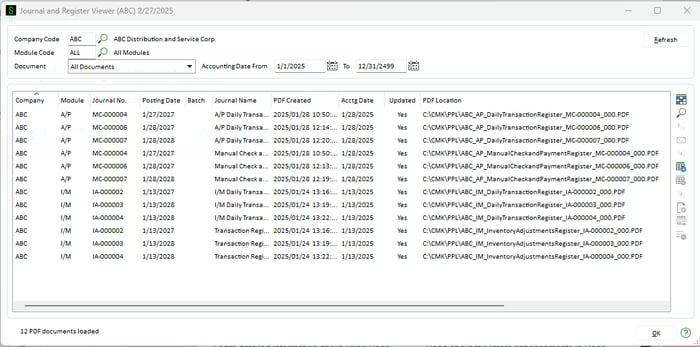
Create a new folder in Windows called "Archive" and move older files into it using the "Paperless Viewers" located under the Main menu of the Paperless Office Module.
Go To: Paperless Office Module > Main menu > Journal and Register Viewer
-
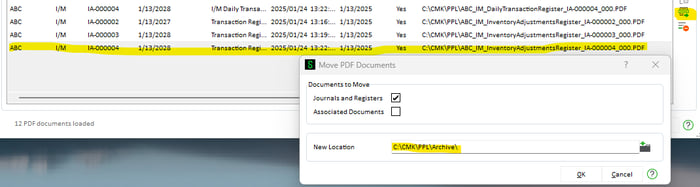
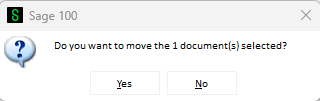
Highlight the item(s) to move. Click on the "Move" icon on the far right. Enter the Archive folder location and click "OK."
-
Click "Yes."
-
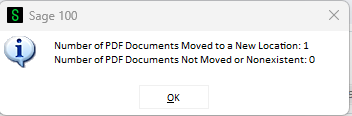
You can now see the item has moved to a new folder.

- If you go back to Windows, you can see that there are 12 PDFs. There are still 13 items since the Archive folder has been added.
Step 3: Purging the documents
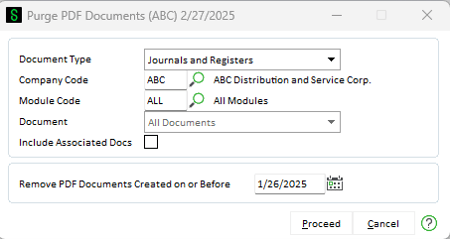
Go To: Paperless Office Module > Utilities Menu > Purge PDF Documents.
-
Options for Document Type:
- All
- Customer Forms
- Vendor Forms
- Employee Forms
- Reports
- Journals and Registers
- Period End Reports
-
Company Code: Select All or a Specific Company Code
Module Code: Select All or a Specific Module
Document: Select All Documents or a specific Document
Remove PDF Documents Created on or Before: Enter Date PDF’s to remove.
-
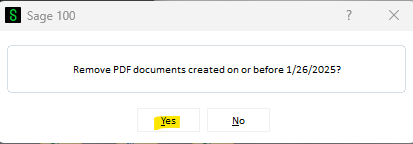
Click "Proceed."
-
Return to the Windows folder to see that the purge removed the files. See below that there are now 7 files left. The purge removed anything dated prior to 1/26.
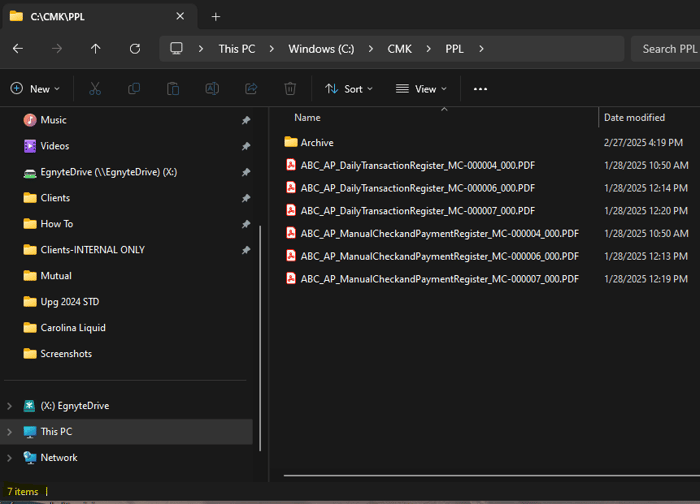
-
The above example showed Journals and Registers. Forms usually have the largest number of files, and they are usually located in separate folders. If you have many locations setup, you can setup a custom lookup to see the paths more easily all at once.
Step 4: Create a Custom Lookup to see Paths all at once
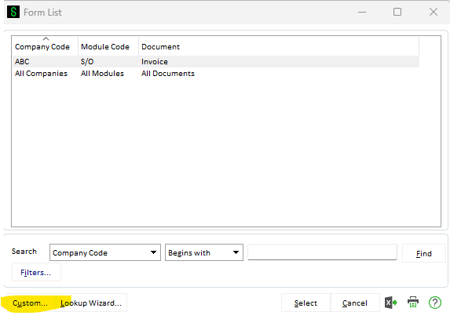
- Go to "Form Maintenance" in the Setup Menu.
- Click on the Flashlight.
-
Click on the "Custom" button in the lower left.
-
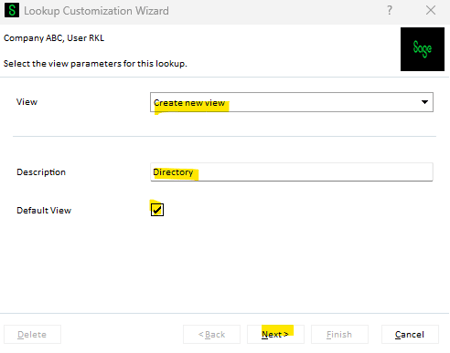
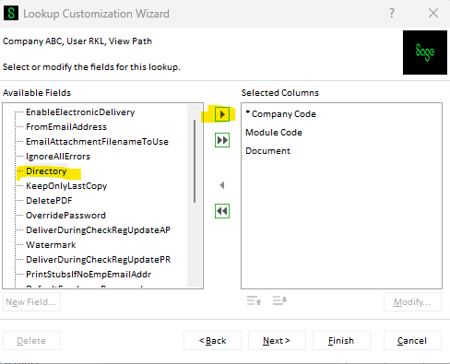
Create a new view, call it “Directory”, click ‘Default View’ and click "Next."
-
Click on "Directory" and the arrow to push the field over to the right-hand side.
-
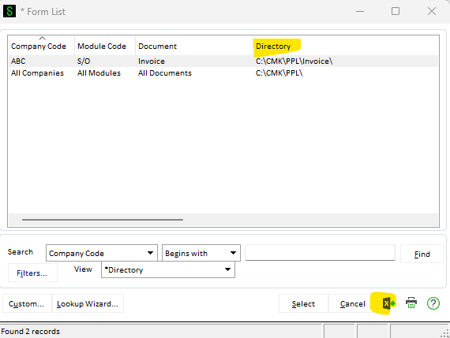
Then click "Finish." You can now see a list in the lookup of all your directories and even export it to Excel.
-
Check all your Directories in all your Setups so that you can check the number of records in each folder using Windows Explorer.
Want More Sage 100 Features & Functions?
Make sure to subscribe to our blog to stay up-to-date on the latest insights and trends. We're dedicated to providing valuable resources for businesses looking to optimize their financial management with Sage 100.
 Check out these blogs to help get you started!
How to Reverse a Cash Receipt
Automate Your Accounts Receivable Workflow with Sage Connect
Leveraging Reports with Sage Business Intelligence
How to Improve Your Sales Order Entry Workflow