

The inter-entity bill back feature in Sage Intacct is for when you have an entity that needs to bill another entity. So when an Accounts Receivable (AR) invoice is created for one entity, the system automatically generates an Accounts Payable (AP) bill for another entity.
This feature can only be used by companies that:
- is multi-entity shared.
- uses AR/AP-focused invoicing and billing.
- don't use account labels.
- don't use the taxes (VAT-enabled) application.
- isn't multi-currency.
How Do I Setup an Inter-Entity Bill Back?
Setting up bill backs involves the mapping of vendors and customers to entities with the creation of multiple bill back templates. Watch this video for a walkthrough of setting up the bill backs.
If you aren't interested in watching the video, here are the steps to create the bill back templates:
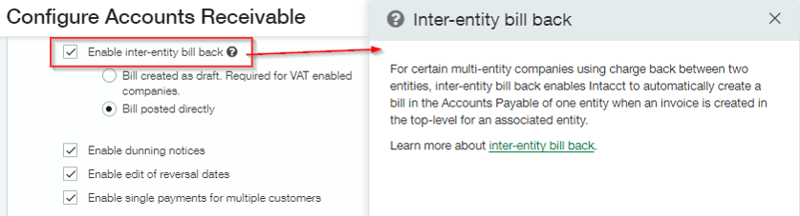
1. Enable inter-company bill back
Before you are able to setup bill backs, you'll have to enable the inter-company bill back feature within the AR configuration. Once there, check the box next to "Enable inter-entity bill back" and make sure to select "Bill posted directly" instead of "Bill created as draft. Required for VAT enabled companies" as long as you do not have taxes application enabled.
2. Grant Permissions
Then you have to grant permission in Accounts Receivable and under "Bill Back Templates" to use the bill back feature. To do this navigate to Company > Admin > Roles > Edit Role > Edit AR permissions. Make sure to check the box for each option (List, View, Add, Edit, and Delete).

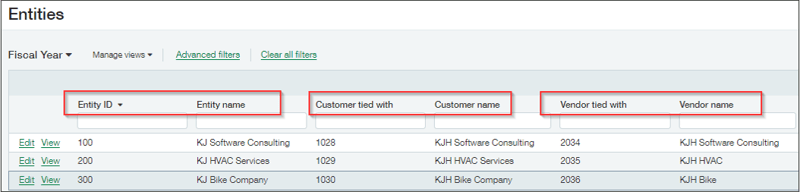
3. Create vendors and customers to associate with entities
Now, you need to create the vendors or customers to associate with the bill back entities. Each bill back customer is associated with one entity, and each bill back vendor is associated with one entity.
After you associate a vendor and customer with an entity, the inter-company bill back can automatically generate a bill based on the associated customer's invoice, as long as you use a template based on the vendor that you associated with inter-company bill back.
Don't forget to enter the terms on the customer so that the "Due Date" will automatically default. The AP bill will use the terms of the AR Invoice.
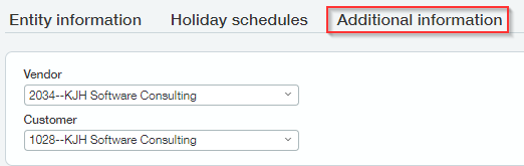
4. Associate a vendor and customer to an entity
Each of the vendors and customers you've just created, have to be linked to an entity. To do this, navigate to Company > Admin tab > Entities and click on the "Edit" button next to Entity. Go to the Additional Information tab and choose a vendor and customer to associate with the entity.
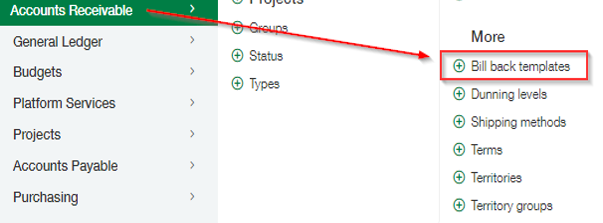
5. Create bill back templates
Once the steps mentioned above are complete, you can create the bill back template. To do this, navigate to Accounts Receivable > Setup tab > Bill back templates.
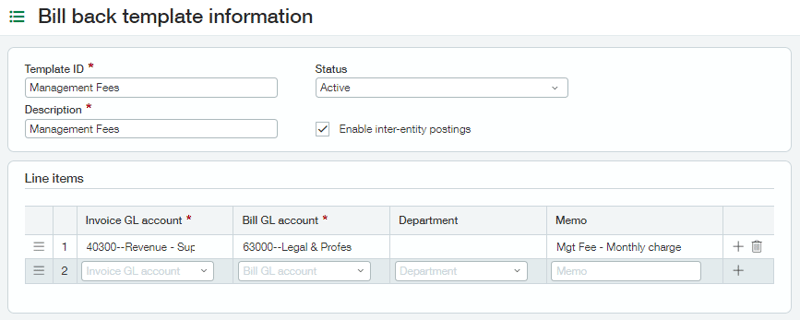
Once that pops up, you'll have to fill out your bill back template information (Template ID, Status, Description, Invoice GL account, Bill GL account, Department, and Memo). The Template ID should be something that makes it clear what the template is used for and the associated accounts should be the revenue account you'll be using for AR and the AP account that will be used on the corresponding AP bill.
How Do I Use Inter-Entity Bill Backs?
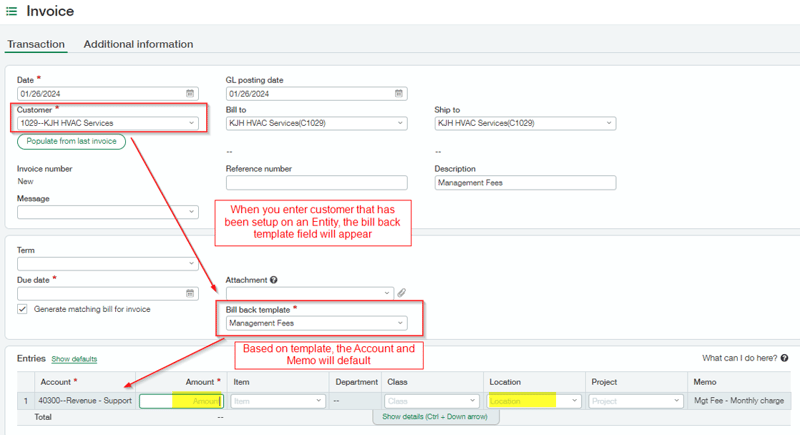
First you'll want to create an invoice for one of the inter-company customers you've just associated to an entity. To create an AR Invoice, go to AR > Invoice > Add. The Bill back template field will appear on the Transaction tab right above the Entries section. Then you'll want to select one of your previously created bill back templates which will default your line item GL account and Memo fields. You'll have to fill in the amount and location for the receivable (and other information as needed).
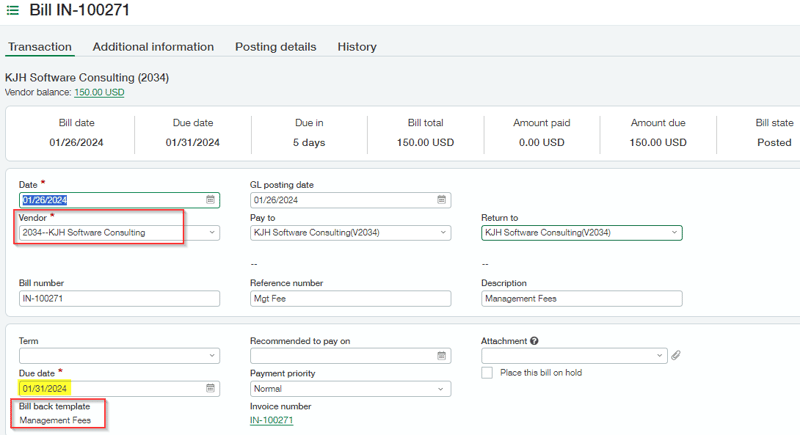
Once you post the AR invoice, an AP bill is automatically created. The vendor on the AP bill is linked to the Entity that was selected on the AR Invoice (from the bill back template) and the Entity on Line is the Customer’s entity that was entered on the AR Invoice.

Want More Sage Intacct Features & Functions?
For more Sage Intacct Tips & Tricks videos, head over to our YouTube page and subscribe to stay up-to-date with the latest insights and tutorials. Our channel is dedicated to providing valuable resources for businesses looking to optimize their financial management with Sage Intacct.

