


Web services can be useful in providing real-time interfaces between any ERP System and an external third-party or custom application. Sage ERP X3 Web Services can expose custom or existing Sage ERP X3 objects and functions as web services.
In the next five days, we'll walk you through using the Web Services function to create SOAP pools, create and publish web services, test web services, create object-based web services, and create subprogram web services. For our first day, we'll focus on how to create a classic SOAP pool.
5 Days of Web Services Series:
- Day 2 - Creating and Publishing Web Services
- Day 3 - Testing Web Services
- Day 4- Consuming Web Services in .NET
- Day 5 - Consuming X3 Subprogram Web Services from .Net
Day 1 - How to Create a Classic SOAP Pool
Step 1: Navigating to SOAP pool Configuration
Once logged in to your Sage X3 instance, navigate to Administration > Administration > Web Services > Classic SOAP pools configuration.

The following screen will appear. If no web service pools have been created yet, there will be no entries in the list.

Step 2: Adding a New SOAP Pool
To add a new web service pool, click “New SOAP pool” from the Actions menu on the right.

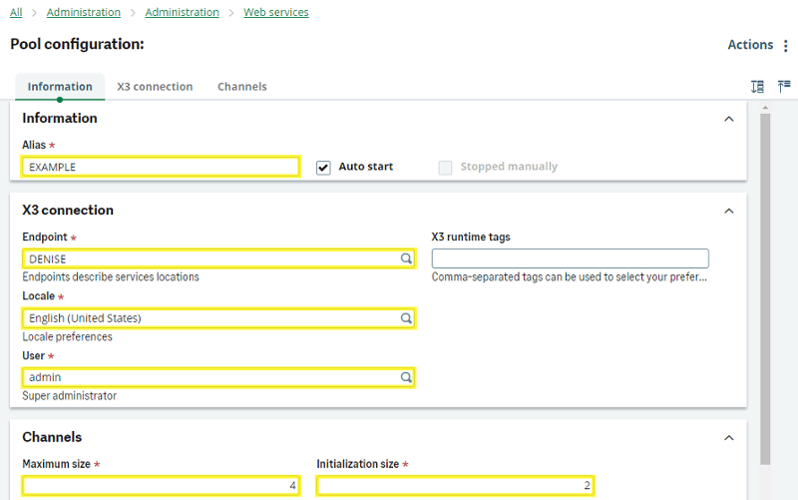
Six fields require information to configure a new SOAP pool: Alias, Endpoint, Locale, User, Maximum size, and Initialization size. I'll define their purpose and the information I've entered in the example below:
- Alias: this is the pool alias and can be any value you choose. For simplicity, I normally enter the same value as the endpoint the pool is set up for
- Example: EXAMPLE
- Auto start: this should always be checked to start the pool, so the pool starts when the Syracuse server starts or restarts
- Endpoint: the X3 endpoint for the pool
- Example: DENISE
- Locale: the locale/language
- Example: English (United States)
- User: the user for channel initialization
- Example: admin
- Maximum size: the maximum number of clients that can be started in the pool
- Example: 4
- Initialization size: the number of clients initialized during pool startup
- Example: 2
Step 3: Saving the SOAP Pool
Once you've finished entering the required information, click on "Actions" in the right-hand corner and then click “Save” to add the pool.

The new SOAP pool that I named "EXAMPLE" has appeared in the list of SOAP pools.

Now that your web service pool has been configured, you are ready to begin building and consuming X3 SOAP web services.
More Web Services Resources:
Want More Sage X3 Features & Functions?
For some Sage X3 videos, head over to our YouTube page and subscribe to stay up-to-date with the latest insights and tutorials. Our channel is dedicated to providing valuable resources for businesses looking to optimize their financial management with Sage X3.

5 Days of Web Services Series:
Day 2 - Creating and Publishing Web ServicesDay 3 - Testing Web Services
Day 4- Consuming Web Services in .NET
Day 5 - Consuming X3 Subprogram Web Services from .Net

