
This is the twelfth lesson in the series Learning Sage X3. When adding new customers in Sage X3, it is convenient to use auto-numbering. In this lesson I am going to go over how to configure auto-numbering on customers.
Before getting further, I wanted to further explain Business Partners (BP for short) from the first blog post. A BP can be a customer as well as other alliances you may have. They can be multiple BP types at the same time. Please refer to Figure 1 to view the field we will be adding the functionality too.
Figure 1 – See the BP Partner Customer field (Common Data -> BPs -> Customers)

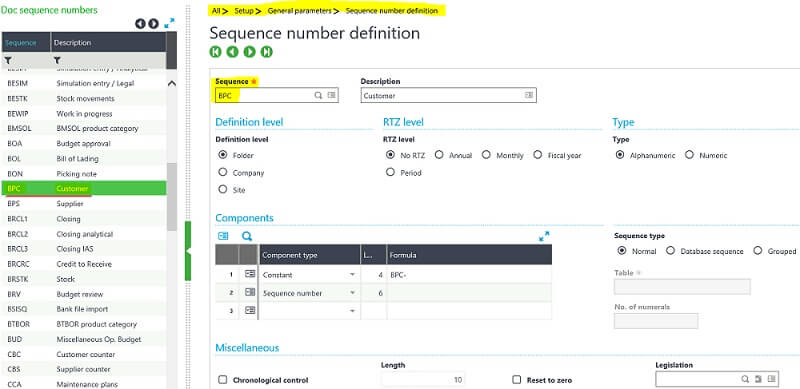
The next step is to configure the Parameter within the SAFE X3 framework controlling this setting. We need to alter the Sequence Number Definition for the Sequence Counter for the customer. The Sequence Counter is ‘BPC’. You can find this by pressing ESC + F6 on the Customer ID field on the Customer maintenance window. Short-cut keys have been mentioned in a previous blog.
Now we know the change to make, navigate to Setup -> General Parameters -> Sequence Number Definition -> Structures (Refer to Figure 2 below). Now select the Sequence ‘BPC’ for the customer field. You will see the components listed below.
Figure 2 – Structures maintenance window
To complete the configuration go into the customer category and assign the sequence field to ‘BPC’ so it allows the system to use the sequence counter.
Figure 3 – Please refer below by navigating to Customer Category (Common Data -> BPs -> Customer Category)
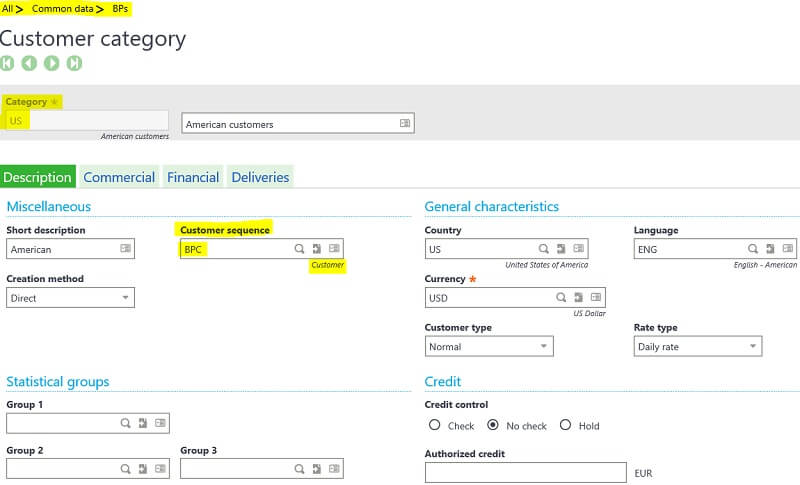
Save your changes to validate the change. Now when you add a new Customer to the system and select the Category ‘US’ it will use the Customer Counter mask defined. You can also apply this base logic to Products, Suppliers, etc.
Stay Tuned for Lesson 13
This is the twelfth post in Learning Sage X3. The next post (Lesson 13) will review, How to Change Commissions in Sage X3 will post on December 12th, 2017. Other lessons in this series can be viewed at:
Lesson 1 of 14 - Important Acronyms and Definitions
Lesson 2 of 14 - General Navigation and User Interface
Lesson 3 of 14 - Sage X3 PU 11
Lesson 4 of 14 - Setting up Chart of Accounts
Lesson 5 of 14 - Sage CRM for X3
Lesson 6 of 14 - How to Add a Custom Report
Lesson 7 of 14 - How to Add a Column to a Left List in Sage X3
Lesson 8 of 14 - How to Export Data from Sage X3
Lesson 9 of 14 - How to Print a Report to Word and Excel
Lesson 10 of 14 - How to Configure a Field to be Mandatory
Lesson 11 of 14- How to Track Changes Made in Sage X3
Need Help with Learning Sage X3?
Contact us if you have more in-depth question or want to Learn Sage X3 or to request help with your system.