

%20copy-1.webp?width=824&height=432&name=Sage%20100%20(29)%20copy-1.webp)
Sage Intelligence offers a flexible tool to allow you to distribute reports using a variety of options. The three available distribution methods are Email, File Publish, and FTP. Report Distribution settings can be applied to any type of report in Sage Intelligence, including Financial Reports, reports from any subledger module, and dashboards.
In this article, you’ll learn about setting up Email Instructions.
Utilizing Sage Intelligence for Report Distribution
- First, access the Distribution Settings from the SI Tools tab in the Excel ribbon. (prior to Sage 100 version 2025, select BI Tools)

-
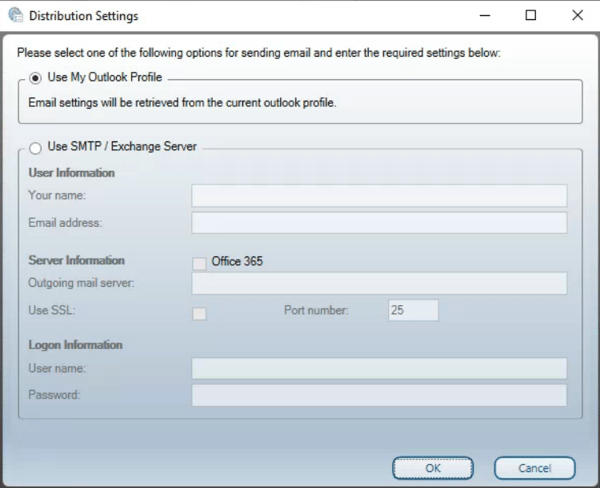
For easy setup to allow you to send directly from within a report, select "Use My Outlook Profile."
-
You can also provide full SMTP/Exchange Server settings, which are necessary in cases where your organization uses another email provider or you would later like to automate report distribution without manual interaction.
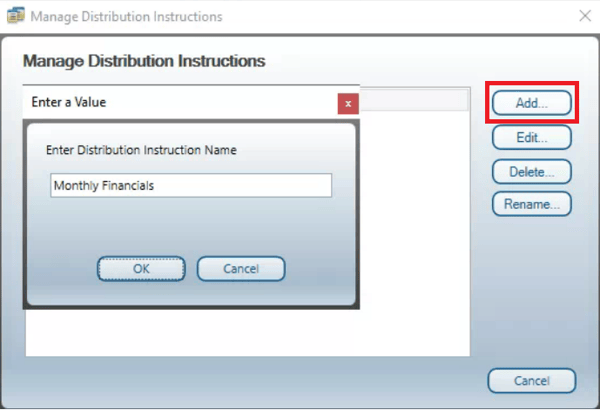
To configure Distribution Instructions from within your report, click on the "SI Tools" tab in the ribbon (prior to Sage 100 version 2025, select BI Tools) and then "Manage Instructions."

-
Click "Add" to enter a new Distribution Instruction Name.
-
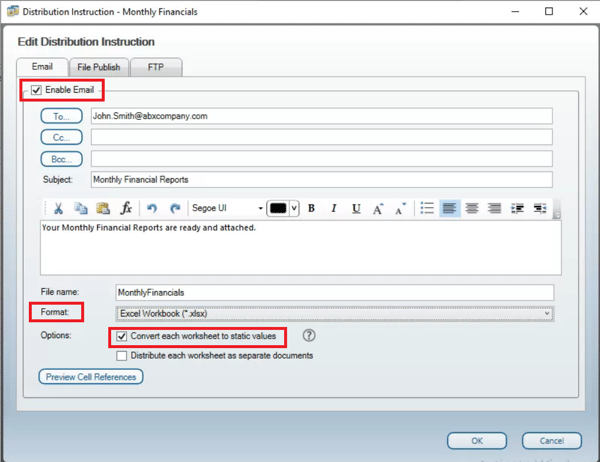
Check the "Enable Email" box and specify your recipients. Add a message for the body of the email. Formatting tools are available to help you customize your message as needed.
-
Name your File and select the Format to use when sending the reports. Choose from Excel Workbook, MHTML, or PDF. If you choose Excel Workbook, you can check the box to distribute the report with formulas converted to static values. When enabled, this feature prevents the recipient from modifying calculations and pivot tables. If your report includes multiple worksheets, you can select to deliver the workbook as one document or separate each worksheet.
-
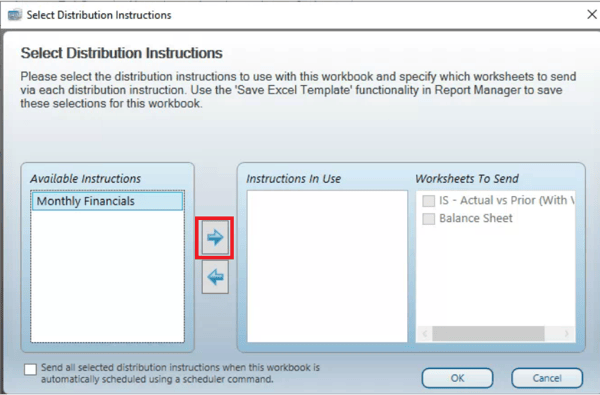
Now that you have a set of Instructions, you’re ready to assign them to one or more reports. To do this, generate a report from your Sage Intelligence Report Manager. On the SI Tools tab, choose "Select Instructions."

-
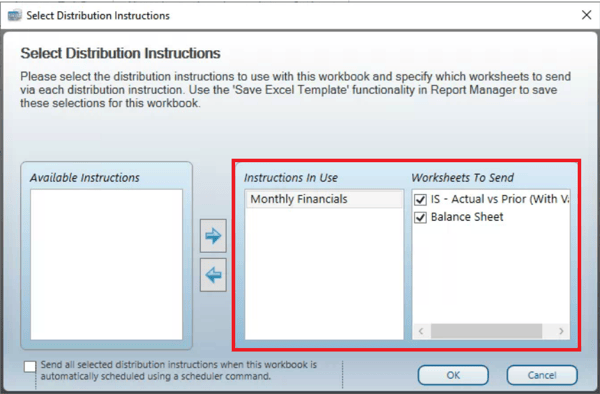
Using the arrow button to move the Available Instructions to Instructions In Use. Select the Worksheets to send. Be sure to save the changes to your report template.
-
You’re now ready to send your reports using the "Send Now" button on your SI Tools tab.

To learn more about configuring report distributions to fit your needs, other methods of report distribution, or how to schedule your reports to be generated and delivered on an automated schedule, contact RKL eSolutions.
Want More Sage 100 Tips & Tricks?
Make sure to subscribe to our blog to stay up-to-date on the latest insights and trends. We're dedicated to providing valuable resources for businesses looking to optimize their financial management with Sage 100.
 Check out these blogs to help get you started!
How to Reverse a Cash Receipt
How to Reverse an Invoice Posted to the Wrong Month
Understanding the Purchases Clearing Report
How to Improve Your Sales Order Entry Workflow