Sometimes it is necessary to call an external process to perform tasks outside of Sage X3. This post will outline pulling data from a 3rd party, and populating a custom table in X3 by calling a .Net executable from X3 4GL code. The process will be done from a .net application which is triggered from an X3 screen. Once the process is complete, the data on the current screen will be refreshed.
This example will use a .net console application, which will accept a parameter from X3. It will perform two steps:
- Retrieve a list of ship methods from a 3rd party web service.
- Load the ship methods into a custom X3 table using a custom X3 subprogram web service.
The .net application will be using an external SOAP web service to pull the data and an X3 SOAP web service to load the data to X3.
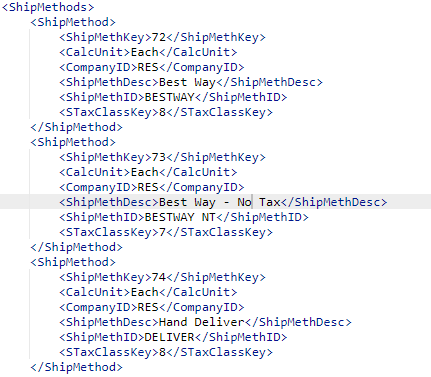
3rd Party Web Service
For this example, the 3rd party web service will return a list of Ship Methods, similar to what is shown below. We will be loading each ship method into a custom table in X3.
Create the X3 Table
The first step will be to create the custom table in X3. This can be done from Development > Data and parameters > Tables > Tables.
Below are the table details:

The columns highlighted are added automatically by X3.
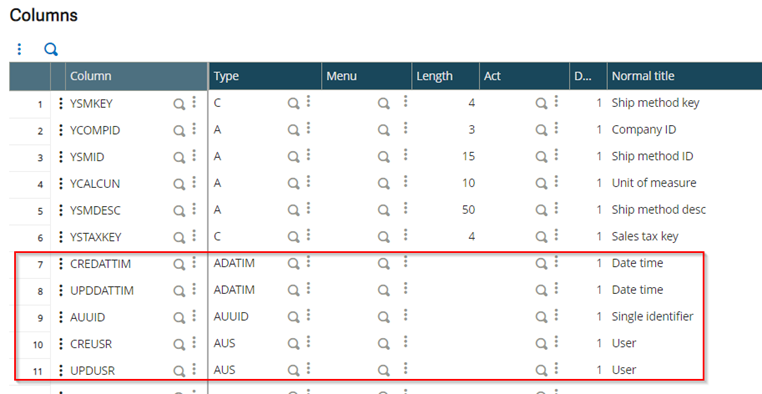
Only one index is required, but I added two here.

Make sure you validate the table.
Create Subprogram to Save Records to Custom Table
The next step is to create the subprogram to add or update records in the YECSHIPM table. The code for this is shown below.
############################################################################
## Subprogram: SAVESM
## Description: Save a ship method to custom table YECSHIPM ############################################################################
Subprog SAVESM(SMKEY, COMPID, SMID, CALCUN, SMDESC, STAXKEY)

ValueInteger SMKEY
ValueChar COMPID
ValueChar SMID
ValueChar CALCUN
ValueChar SMDESC
ValueInteger STAXKEY

# Open shipments table
Ifclalev([F:YESM])= 0 : LocalFile YECSHIPM[YESM] : Endif

Read [F:YESM]YESM0=SMKEY
If !fstat
# Update existing records
[F:YESM]YCOMPID = COMPID
[F:YESM]YSMID = SMID
[F:YESM]YCALCUN = CALCUN
[F:YESM]YSMDESC = SMDESC
[F:YESM]YSTAXKEY = STAXKEY
Rewrite [F:YESM]
Else
# Write new record
[F:YESM]YSMKEY = SMKEY
[F:YESM]YCOMPID = COMPID
[F:YESM]YSMID = SMID
[F:YESM]YCALCUN = CALCUN
[F:YESM]YSMDESC = SMDESC
[F:YESM]YSTAXKEY = STAXKEY
Write [F:YESM]
Endif

CloseLocalFile [YESM]

End
Publish the Subprogram as a web service
The next step is to publish the subprogram created above as a web service. This web service will be called from the .net program to save records from the 3rd party web service to the new X3 table.
Create the subprogram
Go to Development > Script dictionary > Scripts > Subprograms. Create the subprogram as shown below. Make sure the “Web services” checkbox is checked.

Create the Web Service
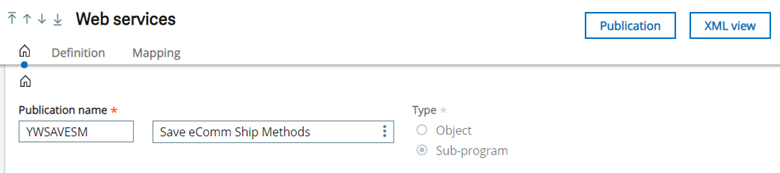
After adding the subprogram, click the “Publication” button to create the web service.

Enter the Publication name and description, as shown below.
After saving the web service, click the “Publication” button to publish it.
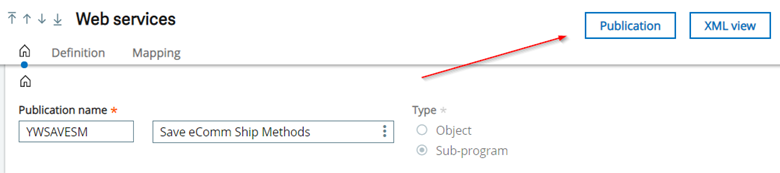
Make sure the “Published on” date changes.
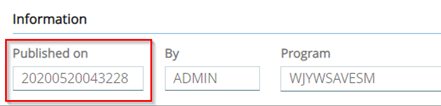
The web service is now ready to consume.
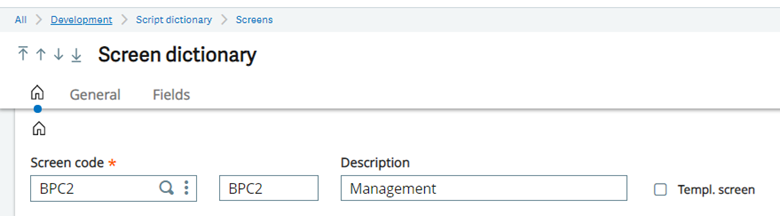
Add Table to Screen
For this example, I am adding the ship methods to the customer screen management tab (BPC2).
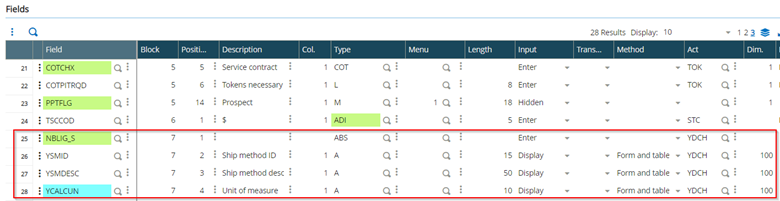
- Add new block called “Ship Methods” for a Table.
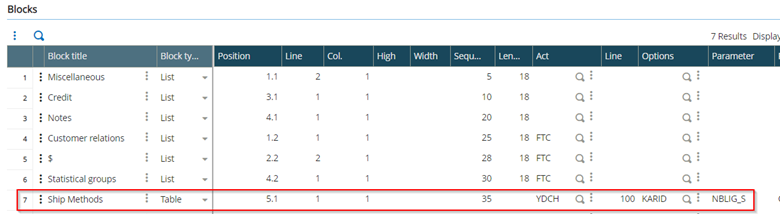
- Add fields to the screen block.
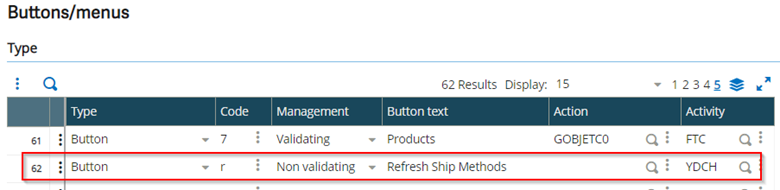
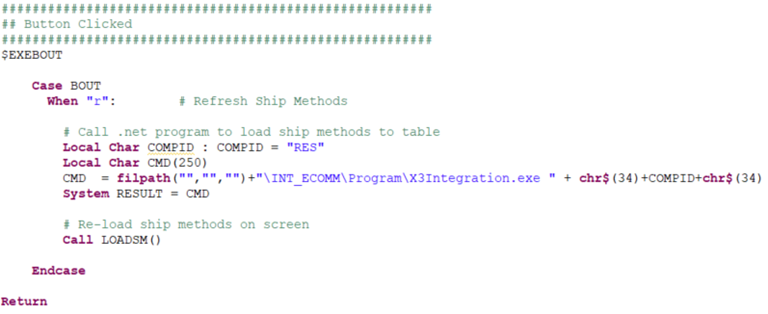
Add Refresh Button
Add a button to the OBPC window to refresh the ship method values.
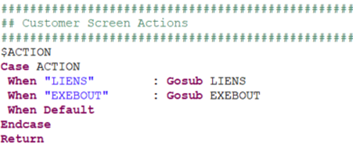
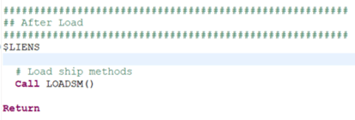
Modify SPEBPC Code
Modify SPEBPC code to populate the table on the screen and to call the external .net .exe upon click of the button to refresh the X3 table by calling the 3rd party web service.
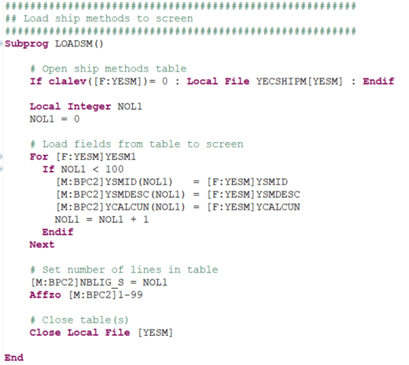
- Add LIENS action to load table by calling subprog LOADSM.
- Add EXEBOUT for code to execute when button is clicked. This is the process that calls the external executable.
Create a .Net Console Application
As was covered in previous blog posts, several steps will be required to prepare the .Net application to access the X3 SOAP services. These are summarized below, but refer to the original posts referenced below for more details.
Day 4 Consuming X3 Object-Based Web Services from .Net
Day 5 Consuming X3 Subprogram Web Services from .Net
Add WSDL Reference
- Add the WSDL service reference to the project for X3.
Add Basic Authentication Class
A standard class is used to do the basic authentication for the web service calls.
- Add a new class called CAdxWebServiceXmlCCServiceBasicAuth.cs to the project.
Retrieve Ecommerce Data
Create a function in the .net application to retrieve the data from the 3rd party. In this case, I am calling a SOAP web service to retrieve a list of ship methods. This is performed in class ECShipMethod.cs in the sample application.
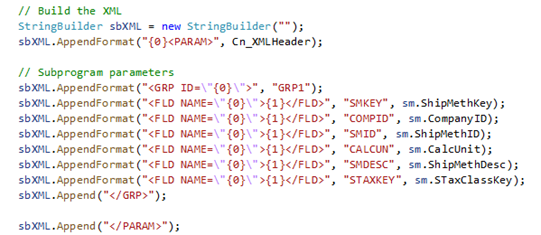
Save the Records to the Custom X3 Table
- Create a method to run a subprogram based web service. For this example, we will create a new class called X3ShpMeth.cs to save the data.
- The SaveX3ShipM will receive the ship method details from the 3rd party web services, and call our custom subprogram to add/update the details to the custom table in X3.
- The parameter passed in is sm, which is of type ShipMethodsShipMethod, which contains the ship method details retrieved from the 3rd party

- We need to provide the XML (or JSON) for the subprogram being called. This will include all of the parameters defined in the subprogram.
- The code below is pretty standard for all web service calls.
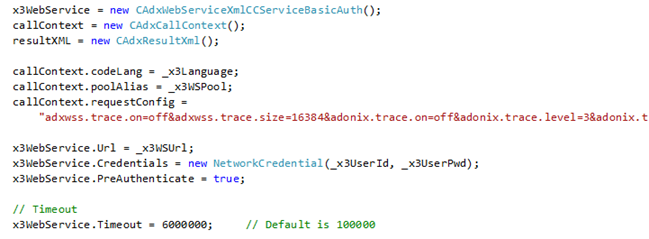
- In this case, we are calling the “run” function. Below we are using the run function, passing the callContext, the web service name (YWSSAVESM) and the XML parameter string.

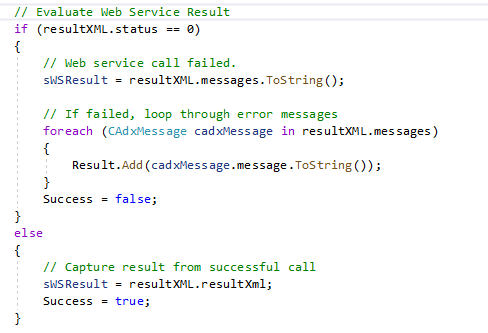
- The result of the web service call can be evaluated as shown below. This is standard for all web service calls.
- Copy the .exe, .dlls and .config files for the .Net application to the X3 server, for the endpoint where it will be executed.
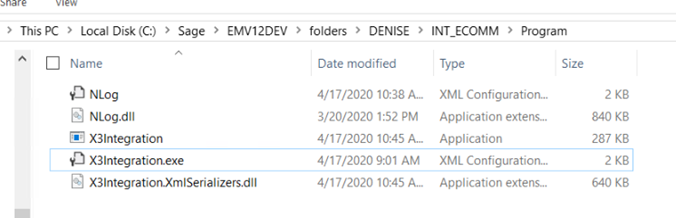
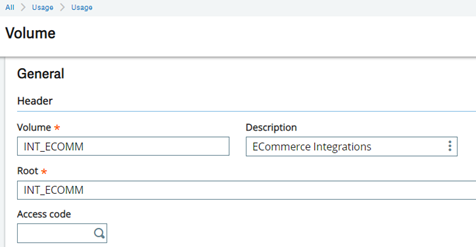
- If a new directory is created on the X3 server, it must also be create in X3 as a Storage Volume.
- Go to Usage > Usage > X3 Storage Areas
- Select Actions > Create to add a new storage area.
View the Results
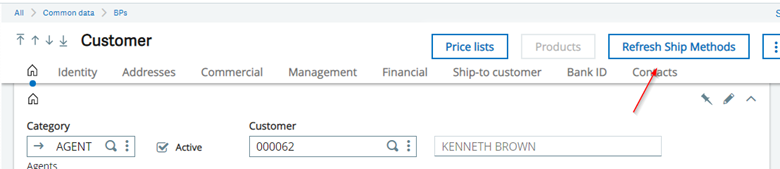
To test the results, we will go to the X3 customer screen.
Notice that we now have a button called “Refresh Ship Methods”.
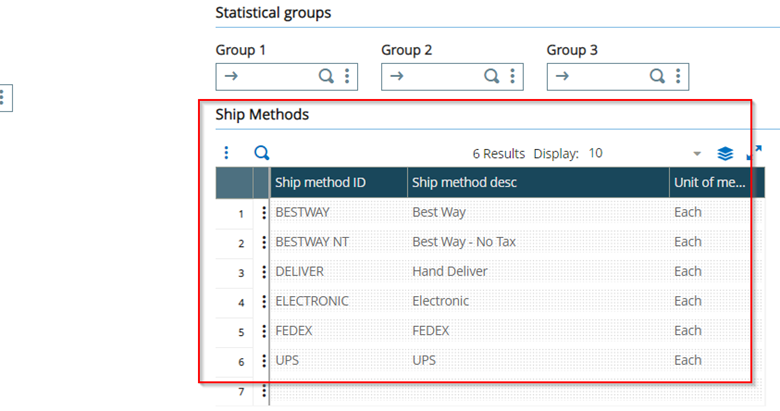
Additionally, there is not a block which contains a table of Ship Methods on the Management section. The contents of this grid were retrieved from a 3rd party web service, loaded into a custom X3 table, then refreshed on the screen.
By clicking the “Refresh Ship Methods” button, the latest values will be retrieved and refreshed on the screen.
Summary
You now have everything you need to call external executable from a Sage X3 4GL program. Although this is a simple example, this can be used for many different integration requirements where accessing an external program from X3 is necessary.